. . . . . . . . . . . . . . . . . . . . . . . . . . . . . . . . . . . . . . . . . . . . . . . . . . . . . . . . . . . . . . . . . . . . . . . . . . . . . . . . . . . . . . . . . . . . . . . . . . . . . . . . . . . . . . . . . . . . . . . . . .

Tuesday 6 November 2018

AGF curated bundles


Art Gallery Fabrics had recently released their newest product:  AGF curated BUNDLES ! 
  • AGF Bundle Up is all about concept sewing and creating based on a theme! Get all the details on the 8 amazing themes offered in AGF Bundle up here
  • AGF Color Master Designer's Palette celebrates AGF designer's signature styles! There are 12 bundles and for more details on this click here
They are available in a bundle or box version! You can choose from Fat Quarter or Half yards!


Here's mine - Katarina Roccella curated bundle, Edition 1. (excited to know that there will be more editions, yay!!!) Look at all 10 prints it includes:


And while I didn't have time yet to play and think about specific projects that can be made using my bundle, I had a chance to play with one of AGF's themed bundles-called Geometrical.


Here are a few pics I took while playing with these beautiful 10 prints, featuring various AGF designers.


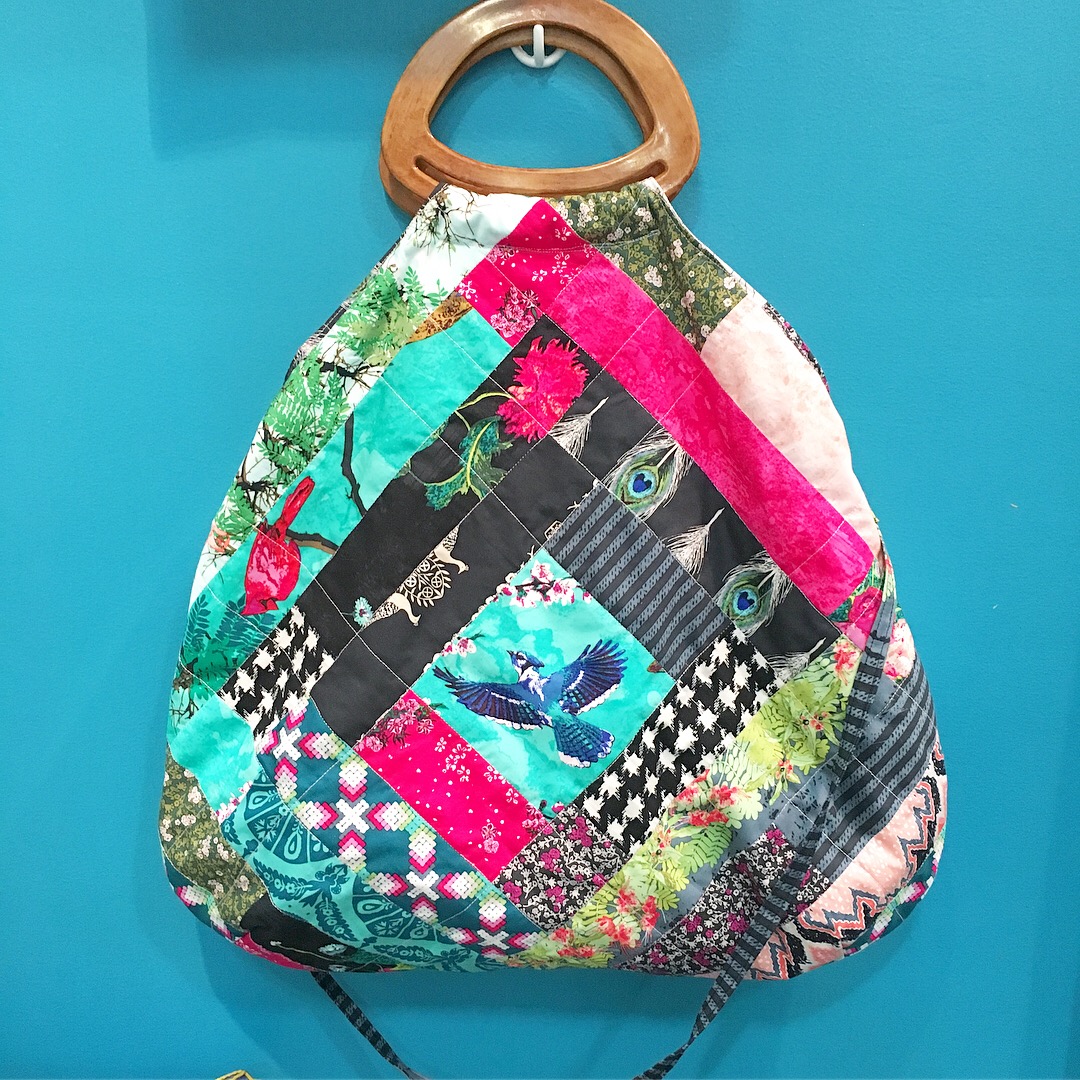
What I really like when thinking about simple patchwork projects is strip piecing and cutting these strip piecing units into colorful strips that can be later pieced in a different way to provide unexpected figures and new shapes That's pretty much how I created my Kubeta block and quilt pattern and here, I used the same technique of cutting the strip piecing unit into 45 degrees cuts of 2" strips. I have combined all the cuts here to create the unique cover for this whimsy laptop bag.


The back is simple and this fun emerald grid fabric was perfect for quick straight line quilting.
I used 2 zippers instead of one to create more colorful opening details and also used a piece of the AGF ribbon that was used to tie up the bundle as the nice side detail, as well.


As I had more fabrics left, I also created my rooted quilt block. You can find detailed instructions for this block as part of the free elemental quilt pattern.


It can be used as pillow front or baby quilt if used as it is.

Hope that you feel inspired to use some of these great bundles and make something amazing, especially with the gift giving season infront us!

Happy sewing,
Katarina


Friday 6 July 2018

Large patchwork handbag with wooden handles - tutorial


As Decadence fabric collection has started shipping to shops and we are preparing the Look book projects, I figured I can try to explain how I created my Large patchwork handbag with wooden handles, that was exposed in my Portland quilt market booth.


As I had very limited time to prepare all the items for my booth, everything was put together very quickly, without precise patterns to follow and unfortunately, without step by step pictures of making them. What I regret the most is that I didn't take any picture of the patchwork I did, before turning it into a bag :(
But, well I know that most of the quilters have many quilt remnants and unfinished quilt or pillow projects-and this can be a great way to quickly turn them into something usable!!!!


So, any kind of patchwork, quilt block or even any kind of fabric can work great for this.
My big log cabin patchwork blog was approx. 24 x 24". The central squares are 5" and the strips were cut to 2.5". As these were only the fabric strike offs, some were longer and some shorter, I just almost randomly pieced them together to a very long strip, which I was cutting as needed to do the log cabin piecing around.

Anyway, if starting from scratch- HERE's how to make the log cabin block! Just add another strip or more to all 4 sides, to obtain bigger block. You can use it like that, or rotate it into a diamond shape, like I did ;)

As my collection has 2 palettes (color stories: Demure and Lush), I just tried to play with one side of the bag featuring one palette, while the other was featuring the other one. It's good as now I can choose which side to "wear",  depending on my outfit ;) or surrounding?


So, in one local craft store I bought the wooden handles and just had to use them. I never used before any bag pattern with these kind of handles, but have found THIS very nice article/tutorial by Martha Stewart with patterns for many types of handles and also sources where to shop for the handles etc.

So, it was easy to draft the handle allowances looking at those patterns. The body of the bag is pretty much taken from my birdy bag, as well as side attachment details for the shoulder strap-only that it was much thinner than the original one.


I am happily wearing my bag daily and getting so much compliments for it's unique look.
Hope that this will inspire you to make one too!!!
Happy sewing!
xx, Katarina


Thursday 5 July 2018

Peacock garden applique/table runner


As you could see from my previous post, I created the Peacock Garden table runner with my newest Decadence fabric collection.
The center of the table runner features the hand applique peacocks with a stylized plant pot in the middle.


This motif comes from my Regal Impressions chinoise print, that comes in quilting cotton-poplin (with metallic accents), as well as in knit.

The inspiration for the print comes from the vintage Yugoslavian laces, that is always a great source of inspiration.


The dimensions of the table runner are: 49" (125 cm) x 35" (89 cm).
Sew allowance is 1/4".

To create it yourself, here's what you'll need:

1. main fabric: 1 yard of the 44/45" wide fabric ( I used PE 413 Caviar )
2. frame squares - 78 (seventy eight) of various prints of quilting cotton cut in 2.5" squares (I have cut 4 pieces of each of the 20 prints from the Decadence collection)
3. yarn for the central peacock applique (I used COSMO Sparkle Metallic Embroidery Floss for hand embroidery in Champagne)
4. binding trim or fabric strips: 5 yds of 2 ¼ " binding trim ( I used 4 strips of 2 ¼ " x WOF  of the Striped Fleur Paradis Fabric from Decadence collection)
5. peacock tails applique pieces: fat quarter of the Plumage Mirrors Noir print - cut 28 feathers
6. backing fabric: 1 1/2 yards
7. batting: approx. 40 x 55" piece
8. sewing machine, thread, scissors, pins, iron

Use the entire width of the fabric (44/45") and cut approx. 33" for vertical sides (I suggest cutting like this, so that you can cut it more precisely once the frame squares will be pieced and ready to add to the main fabric piece.
The precise dimension of the main fabric piece is : 44.5" x 30.5"

For the central embroidery, download the free template HERE.
As the peacock image is the mirror image, you will need to trace the same drawing for both sides, using the vertical grey line as the central point.


It was a bit tricky to find the best way to trace the image on the dark fabric, but HERE's how to do it.
For the hand stitching, I used the chain stitch and the running stitch.


Once the embroidery is finished, start pinning all the feathers for the tails. My plan was to do the needle turn applique for them and that's why I left approx. 1/4 seam allowance around the feather shapes, but due to the time limit I had, I did the free motion quilting but only after I finished the quilt (table runner) top and made a quilt sandwich.


Sew the square frame.

There are 22 squares forming the horizontal row and 17 squares in the vertical row. Make two vertical and two horizontal rows to form the entire square frame. Press them.
Use the obtained dimension of vertical rows (it will depend on your piecing precision) to precisely cut the main fabric.
Sew the horizontal rows first to the main fabric and after that, join the vertical rows to complete the frame.
To make the quilt sandwich:
Place backing fabric on a large surface-wrong side up and stretch it with masking tape against that surface. Place batting on top of the backing fabric. Place quilt top on top of the batting with right side facing up. Smooth away wrinkles with your hands. Pin all layers together and baste with basting thread, using long stitches. You can also use safety pins to join the layers. Machine or hand quilt starting at the center and working towards the corners. After you finish, trim excess of any fabric or batting, squaring the quilt to proceed binding it.

I suggest doing the Double Fold Binding, which has double thickness. If  making your own trim from fabric-cut four (4) 2 ¼ " wide strips by the width (WOF) from the fabric to make a final strip 176" long. Fold and press the long strip in half lengthwise (on the shorter side), wrong sides together. Cut the beginning of the binding strip at a 45° angle. Start sewing the binding strip in the middle of one of the sides of the quilt, leaving approximately 5" long tail loose. Sew with ¼" seam allowance (using straight stitch), aligning the strip’s raw edge with the quilt top’s raw edge. Pin in place if needed. When your needle is 1/4˝ from the corner, turn the quilt and stitch off at a 45° angle and stitch reaching the end of that corner. Turn the quilt and fold the strip in a motion of 45° and upward, pressing with your fingers, using the angled stitch as your guide. Hold this fold with your finger, bring the strip down in line with the next edge, making a horizontal fold that aligns with the top edge of the quilt. Start sewing at ¼" of the border, stitching all the layers. Do the same in the four corners of the quilt. When approaching the starting point, stop stitching at least 10˝ from where you started, leaving another tail, at least 6” long. There will be a gap between the stitched bindings. Unfold the ending binding and align it nicely with the quilt edge. Open the ending strip toward the quilt, right sides together and place the beginning of the binding strip that is cut at 45° inside the open part of the ending binding strip. Using a pencil or a pin, mark the line on the ending binding strip where the begging piece lays. Mark another parallel line to the first one, precisely ½ “ distant, so that it can be lined and sewn perfectly with the other end, using 1/4 seam allowance. Pin and sew the ends, right sides together. Press the seam open and finish sewing that remaining binding piece onto the quilt edge. Turn binding to the back of the quilt, far enough to cover the trimmed edges and stitch by hand using blind stitch.
Happy sewing!!
Katarina
xx

Tuesday 12 June 2018

Quilt Market in Portland 2018.


Another amazing Quilt market is over and I was thrilled to introduce my next fabric collection with Art Gallery Fabrics called Decadence.


photoof me by my dear friend, Gwyn Colleen who helped me a lot
 
The collection will be available next month, so I will save another post for that and just go through some booth pics and also some of my favorite pics from the journey.


The quilt market was held from 18-20 May in the Portland's Convention center. It was placed in the Lloyd District, where our hotel was also situated and it was very easy to reach some nearby points and attractions with their local MAX railway transportation.


My impression of the Quilt Market was that it was definitely smaller than usual and that many visitors were locals, but it was great chance to meet and chat with people visiting and exhibiting.


I was very happy with quick and successful installation of my Vintage damask teal wallpaper from Spoonflower and I love how it somehow gathered everything together, giving that vintage kitchy look that I wanted to obtain.


I really liked the look of my booth, especially as I didn't have a lot of time for sewing, and living outside of US, forced me to make all of the samples by myself.


I enjoyed visiting Portland's Art Museum and seeing some contemporary and old masters work.


 Enjoyed seeing so many greenery in the city and especially outside. With my friend Lauv, I was so happy to be able to visit Multnomah Falls, Hood River city, Ecola State Park, Cannon beach and many other beautiful sites and places, driving through...


Hope you enjoyed,
xx
Katarina