

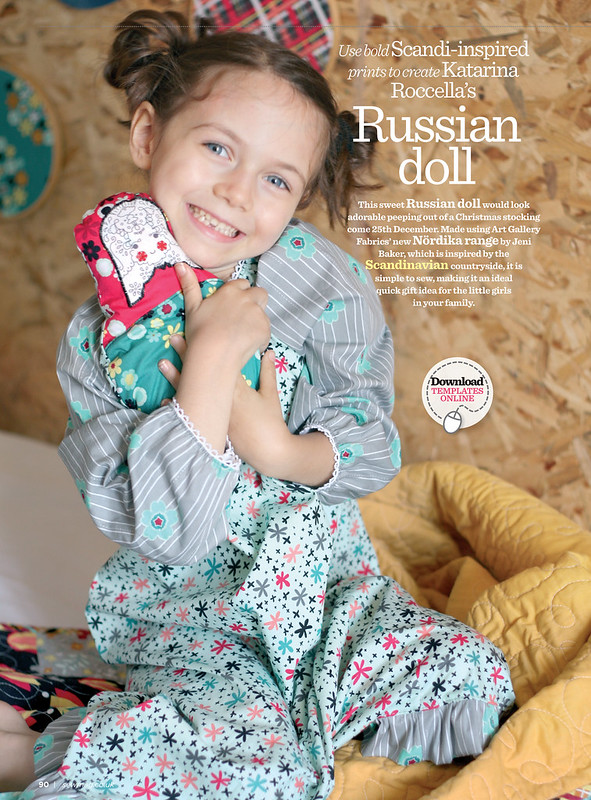
I have used this pattern to make cute Nordika doll (Nordika collection by Jeni Baker), that was featured in the December 2013 issue of Sew magazine UK.
I am thrilled that now I can share this pattern with all of you and that I can use my Recollection line to sew a few dolls.
Doll dimensions: 7 x 9.5" (17.5 x 24 cm)
Needed supplies:
1. fabric: this is great project using scraps
2. small piece of heavy weight fusible interfacing (for the face)
3. sewing machine, thread (for the best results - use Aurifil), scissors, pins, iron
4. embellishments (optional): buttons, ribbons, sequins etc.

Wash and press all fabrics.
Go HERE to download and print the template.


Using the paper templates (2 pieces), cut the front pieces.With the 1/4 cm seam allowance, sew them together, right sides inside. Press the seam.
1. The shape you got - is the front side of the doll. Using that shape cut the back side of the doll.

-I have transferred the face lines onto the heavy weight white fusible interfacing (that way I could easily just iron it in place) and I have embroidered it with Aurifil floss. You can customize the face by removing or adding some lines to the original face drawing.
If you don't like the given shape for the face, you can simply cut 3" circle and stitch it.
Once you are happy with the face, cut out the shape and position it on the head.
Sew the doll’s face to the front side of the doll, using the zig zag stitch.
3. Place the front and back piece, right sides together, pin and sew using 1/4” seam allowance, leaving a gap at the bottom that will allow turning the doll inside out.

This doll can be a great gift-giving item, for the Holidays. It can be used for kids to play with it or it can be used as a home decor.

If you scale the template to be much bigger in size (like one of the dolls above), it can be nice pillow.
Obviously, if using it as a pillow, don't exaggerate with the craft details, especially sharp plastic items.
Happy sewing,
Katarina


 GRID
GRID
 DECADENCE


1 comment :
I have handkerchiefs that I think would be great for the head and face. Just use the corners or edges with designs and embroider the face in the unmarked part of the handkerchief. Neat dolls!
Post a Comment