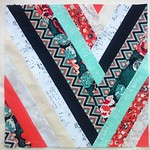
If you have been following along through my Instagram account, then you know that there's still time to join the fun and catch up with the previous posts/weeks.
Cabin Spark quilt-along schedule:
- Week 1, October 24 - Kickoff + Fabric Pull
- Week 2, October 31 - Cutting Party
- Week 3, November 7 - Block Construction
- Week 4, November 14 - Layout + Assembly
- Week 5, November 21 - Quilting + Finish
And here's the video where you can watch me transforming my quilt top into a finished quilt!
Finishing a quilt top is an exciting step in the quilting process and for some quilters it's the moment of true artistry, when selecting and making the quilting style and design. It is where the quilt truly becomes a work of art. It is a testament to the quilter's creativity, skill and passion and it's a stage where the quilt's narrative takes central stage, ready to captivate and comfort for generations to come.
Here's some guidance and steps to follow to ensure a successful finish:
1. Inspect your quilt top.
Before proceeding, carefully inspect your quilt top. Check for any loose threads, stray pins or uneven seams. Make any necessary corrections or repairs to ensure a polished look.
Preparing the binding is an important step in the quilting process, as it not only adds a decorative edge, but also secures the quilts layers together. Properly preparing and attaching the binding will give your quilt a profession finish and make it ready for use or display.
Working with a striped print for your binding is always fun—especially when it’s multicolored and full of personality. But if you want the colors to flow in a continuous order all around the quilt, you’ll need to pay special attention when joining your bias strips. Here’s a step-by-step tutorial to help you create double-fold bias binding while keeping those stripes beautifully aligned.
Cut Your Bias Strips
- Cut strips at your preferred width (usually 2¼" or 2½" for double-fold binding).
Bias-cut stripes are perfect for creating a candy-cane or ribbon effect along the quilt edge.
Lay Out the Strips in Color Order
Before sewing anything:
- Spread the strips out on a flat surface.
- Look at the stripe sequence on each strip—identify the repeating pattern (for example: yellow → blue → red → green).
- Arrange the strips so the color sequence continues naturally from one strip to the next.
This step saves time later and avoids mismatched color jumps.
3. Join the Strips With a Diagonal Seam
To maintain the stripe flow, you’ll join the strips on the bias.
- Place the end of Strip A right side up.
- Place Strip B right side down, perpendicular to Strip A, forming an L-shape.
- Shift Strip B slightly left or right until the stripe colors line up.
- You’ll need to overlap the next-in-order stripe on Strip B directly over the previous stripe on Strip A, so that the sequence continues without interruption.
- Think of it as matching the “next color in line” on B to the “last color stitched” on A to keep the flow perfectly continuous.
- Draw a diagonal stitching line from the top left corner to the bottom right corner.
- Pin carefully, checking alignment one more time.
- Sew on the drawn line that will be on the white space between the colored lines so that it will become invisible once sewn.
Tip: Before trimming the seam allowance, open the seam to check whether the stripes transition smoothly from Strip A to Strip B. Adjust if needed.
Fold the Strips Into Double-Fold Binding
Once your binding is one long continuous strip:
- Press it wrong sides together lengthwise.
- Keep the edges perfectly aligned so the stripes stay straight.
- Roll it up neatly to avoid twisting once you start attaching it.
3. Prepare the quilt backing.
Cut a backing fabric to the size of your quilt top, leaving a few extra inches on each side for manoeuvring during the quilting process. I like to sandwich my quilts on the floor- so I clear&clean the floor area and lay my backing fabric wrong side up on the floor. I smooth it out and iron it to remove wrinkles or folds. I use painters tape to secure the edges of the backing fabric to the floor making sure it's taut but not overly stretched.
4. Prepare the quilt sandwich.
I place the batting on top of the backing fabric and I carefully position my quilt top right side up on top of the batting, starting from the center and working my way out toward the edges. I press it with iron to eliminate any wrinkles.
5. Basting
I like using safety pins to secure the layers and the basting spray to bond better the batting with the backing.
6. Quilt
With your quilt sandwich prepared, you can proceed to quilt it using your preferred quilting technique. If you're not quilting it immediately, you can roll up the sandwich for storage until you're ready to quilt.
No matter your quilting style, the Cabin Spark blocks are ready for it. Straight-line quilting reinforces the clean, graphic structure of the logs, while all-over free-motion quilting brings extra texture and depth, making scrappy or vibrant prints come alive.
7. Trim the quilt edges.
Trim the excess fabric from the edges of your quilt sandwich using a ruler and rotary cutter to achieve clean, straight edges. Ensure that all sides are even and that the corners are squared.
8. Prepare and attach the binding to the quilt's raw edges.
Double fold binding is a common choice and my favorite one. Machine sew the binding to the front of the quilt and hand or machine stitch it at the back for a neat finish. I chose the Jolly Ribbons festive print, which adds a lovely bias-stripe frame to the quilt.
9. Final press.
After the binding is attached and stitched, give the entire quilt a final press to set the binding and ensure a polished appearance.







 GRID
GRID
 DECADENCE


