. . . . . . . . . . . . . . . . . . . . . . . . . . . . . . . . . . . . . . . . . . . . . . . . . . . . . . . . . . . . . . . . . . . . . . . . . . . . . . . . . . . . . . . . . . . . . . . . . . . . . . . . . . . . . . . . . . . . . . . . . .

Monday 28 December 2020

Aquarelle fabric collection

My Aquarelle collection for Art Gallery fabrics is out, as well as Aquarelle fabrics look book by AGF.

The look book is filled with so many beautiful projects, and as always I can't THANK enough everyone for taking their time to create something unique with this collection.

Aquarelle by Katarina Roccella

In my previous post, you could see some ornaments I created and now, I want to share some pics of the Interlude quilt I created with Aquarelle fabrics.


I didn't have my yardage available with me at the time that I was making the quilt, mostly during November, as my original vision and mock-up was this one, aside. 


But I am sure that I will re-create it in similar, darker version with some next collection, perhaps.


My quilting skills haven't improved much in the last few years, I think, but I am so happy with the overall look, especially as the quilt is quite big (66 x 88").
I put the 30% discount in my Etsy shop till the end of this year, so if you have desire to try some of my  PDF patterns, now is a good moment to do that ;)

Happy Holidays and Happy New Year!!!


Katarina
xx

Thursday 17 December 2020

Easy fabric Xmas ornaments in Aquarelle


Xmas is just around the corner and I am so happy that I had new fabrics to play with. 
It's my Aquarelle collection for Art Gallery fabrics.:)


I will dedicate the next post to better introduction and presentation of the collection, but I had to show off these freshly made fabric ornaments, that were so easy and fun to make! 
Actually I am so happy that this year we decided to buy a small natural tree that we can't wait to plant in the garden, just after the Holidays.


Regarding the ornaments, I browsed the internet to find some ideas and here are the links to some great ideas:
👉 no sew Xmas scrap trees
instead of the cinnamon sticks, I used some vintage wooden spools that were perfect for wrapping few fabric strips (just folded in half lengthwise) and holding the ribbon tied into a knot at the bottom


Hope you are trying to bring some joy into this Xmas period, which is not very easy with current pandemic, but let's stay well (positive would sound totally inappropriate) and safe!!!
Happy Holidays and happy sewing!
xx
Katarina

Tuesday 10 November 2020

Picturesque fabric collection


My Picturesque fabric collection is available and now that the look book is also out, I am posting some pictures, that hopefully may be inspiring to you as well. 


Also, here is the list of the matching pictured Pure element solids:

Linen White

Crystal Pink

Grapefruit

Coral Reef

Flamingo

Crystalline

Spruce

Tender Green

Patina Green

Died Moss

Forest Night

Magnetism


This collection is divided into 2 colorways: Vivid Artistry and Poetic Dreams, it has one print in knit and 2 in rayon. For the first time, I have the collection available as precut bundle - so called fabric Wonders available in 10" fabric cuts (42 pieces).


Look book is full of inspiring projects, from home decor and quilts, to garment sewing. Here are a few pics of very talented makers that were collaborating with their amazing projects.


                                                              Marcela quilt by Barbara Opett

....and much more! Here are a few projects I've managed to sew too :


Hope you will enjoy using this collection in your projects, just as much as enjoyed creating it.
XX,
Katarina

Sunday 18 October 2020

Moresco table runner


I always wanted to make one simple table runner for my table and finally I did it! I used one of my first quilt patterns that was featuring my very first fabric collection, Indelible and adapted it a bit to make this very easy to make table runner.

You can see the original pattern HERE.

And here are the measurements/requirements for this table runner:

Finished size: 27.5 x 54.5 “ (70 x 138 cm)

Block size: 14 x 14”

Total blocks per table runner: 8 (4 blocks A and 4 blocks B)

Seam allowance: ¼”

Based on the 42” wide fabric.


The whole quilt is constructed with 2 ½ strips. Each block is composed of 7 rows. 

There are 4 blocks in one orientation (blocks A) and 4 blocks in mirror-image orientation (blocks B)


Fabric A: PIC-39454 Painted Field Tangerine                                       1/6 yd

Fabric B: PIC-39457 Botanical Study Soft                                            1/6 yd

Fabric C: PIC-29458 Mystical Quest by Night                                     1/6 yd

Fabric D: PIC-29457 Botanical Study Dark                                          1/6 yd

Fabric E: PIC-29454 Painted Field Cerise                                             1/6 yd

Fabric F: PIC-29451 Arts & Crafts Rose                                               1/8 yd

Fabric G: PIC-39456 Bound Treasures Blush                                        1/8 yd

Fabric H: PIC-39455 Ornatile Vert                                                         1/6 yd

Fabric I: PIC-39458 Mystical Quest by Day                                          1/8 yd

Fabric J: PIC-39451 Arts & Crafts Cloud                                              1/8 yd

Fabric K: PE-433 Snow                                                                          5/8 yd             

Fabric L: PE-413 Caviar     or   PIC-29456                                            1/3 yd


Binding fabric: 1/2  yds (suggested)

Backing fabric: 1 3/4  yds (suggested)


Cutting directions:

¼ seam allowances are included


eight (88.5” x 2.5” rectangles from Fabric A

eight (8) 8.5” x 2.5” rectangles from Fabric B   

eight (8) 8.5” x 2.5” rectangles from Fabric C   

eight (8) 8.5” x 2.5” rectangles from Fabric D   

eight (8) 6.5” x 2.5” rectangles from Fabric E   

eight (8) 4.5” x 2.5” rectangles from Fabric F   

eight (8) 2.5” x 2.5” squares from Fabric G   

eight (8) 6.5” x 2.5” rectangles from Fabric H   

eight (8) 4.5” x 2.5” rectangles from Fabric I    

eight (8) 2.5” x 2.5” squares from Fabric J    

eight (8) 2.5” x 2.5”  squares from Fabric K

eight (8) 4.5” x 2.5” rectangles from Fabric K

hundred (32) 6.5” x 2.5” rectangles from Fabric K

eight (8) 2.5” x 2.5”  squares from Fabric L

eight (8) 4.5” x 2.5” rectangles from Fabric L

eight (8) 6.5” x 2.5” rectangles from Fabric L


                                                BLOCK A   and   BLOCK B


And here's the assembled table runner:


If there will be some interest, I will probably write the PDF pattern soon, but hopefully this can help enough for anyone willing to create it ;)


Enjoy,
Katarina

Wednesday 14 October 2020

Dunes quilt block - pillow tutorial


Last year, I was asked to create something simple and fun for the Simple sewing magazine, featuring my color master designer box collection. So I designed this easy block constructed with 3" HSTs and turned it into a pillow, actually I made two;)

I was brainstorming ideas for the pillows for my just released Picturesque collection and as HTS are always a good idea for the pillow covers, I used the same block! I also got some HST left overs, so I created another composition, but I will show them both in my next blog post, just wanted to have the original version saved here, before ;)


So here it goes:


Decorative pillow covers are the easiest and fastest way to change the home décor, without major investment. Bold and funky patterns can sometimes be too much or too busy if used in bigger home décor projects, but can be awesome if used for smaller scales projects, like pillows, to embellish and add a touch of color and pattern in your home space. Additionally, quilting adds a bit of texture and stabilize the sewing/piecing, while trimming around the edges, adds a modern look.


To get the printable template, download it HERE


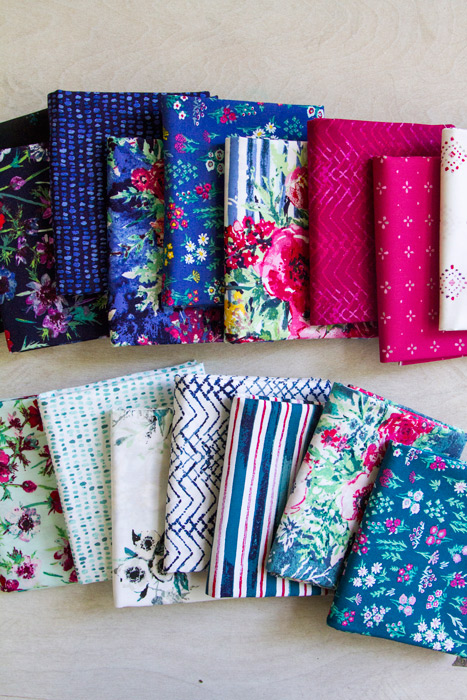
The featured fabrics: “Paprounes Crimson”, “Uninhibited Fashion”, “Steps Above Prism”, “Greeka Fouxia” and  “Morse Dot Sun” from the “Designer’s palette, edition #1” by Katarina Roccella for Art Gallery Fabrics.


Materials

For 1 pillow, finished size 15 x 15”


-Fabrics:

Fabric A:  Paprounes Crimson, Fat eight

Fabric B:  Uninhibited Fashion, Fat quarter

Fabric C:  Steps Above Prism, 5/8 yard

Fabric D:  Greeka Fouxia, Fat eight

Fabric E:  Morse Dot Sun, Fat eight

Decorative trim (pom-pom or similar): 2 yds

-Medium weight, one-sided fusible interfacing or batting - 16 x 16” piece 

-Pompom or other decoratiove trim, 65” long (2 yds)

-16x16” or 15x15” pillow insert

-Cutting mat and rotary cuter* optional

-Ruler  

-Scissors

-Iron

-Needle and thread

-Sewing machine

-Pins

-Fabric pencil or marker


CUTTING:

¼ seam allowances are included


Two (2) 4“ x 4” squares from Fabric A

Ten (10) 4“ x 4” squares from Fabric B

Two (2) 17“ x 22” rectangles from Fabric B (for pillow back)

Ten (10) 4“ x 4” squares from Fabric C

Eight (8) 4“ x 4” squares from Fabric D

Six (6) 4“ x 4” squares from Fabric E


Pillow front


To make the pillow front, there are total of 36 HSTs (half-square triangles).

Guided by the cutting and fabric requirements, make the following HSTs:


A+B    make 4

B+C    make 16

E+D    make 12

D+C    make 4


HSTs construction:


Place and align two 4” x 4” squares in corresponding prints, right sides together and with a marker or pencil draw a diagonal line across the wrong side of the fabric. Sew a 1/4" seam on both sides of the drawn line. Cut the squares on the drawn line. In this way, you will obtain two HST’s. Press seams either open or to one side, upon your preferences. Pressing the seams open eliminates bulk and makes it easier to match the seams. Trim HSTs to 3 x 3”.


Following the quilt block diagram, compose the quilt block: start by joining the HST units (as shown in diagram) in order to obtain the horizontal rows. Sew all right sides together with ¼ seam allowance. Press the seams. Join the composed horizontal rows to complete the block. Press the seams. Fuse the interfacing on the wrong side of the block /pillow front or pin the piece of batting and quilt it. If needed, trim and square the pillow front. 


Adding the trim


With right side of the pillow front up, start pinning the trim all way around, starting from one corner and rounding it slightly on all corners. Sew the trimming in place, with the smallest seam allowance possible, finishing where you started, overlapping the trim’s edges.


Note: there are different weights, qualities and sizes of the trims, and depending on that, you may be able or not to slightly round the corners for the nice and professional finish. Thinner and softer trimmings are more suitable for shaping, while with thicker trimmings, you may be forced to cut the trimming separately for each of the pillow’s edges and overlap the edges on all corners. 


Pillow back


The easiest way to make the pillow back is with simple envelope back. 

Take the rectangles cut for the pillow back, fold and press them on the longer side (22”) in half, wrong sides inside, so that you obtain two 17 x 11” pieces. 


Pillow assemble


Overlap the back pieces, squaring them and place the pillow front with right side inside-facing the overlapped backs. Pin all layers together and cut the backs leftover edges to the size of the pillow front- 15.5 x 15.5”. Sew around all edges with ¼ seam allowance, rounding the corners slightly, to prevent protruding. Turn the pillow case right side out and place the pillow insert inside.


xx

Katarina

Tuesday 14 April 2020

Fabric face mask tutorial


Hi!
It's been a while...and maybe I wouldn't even pop up, if it wasn't for this new Pandemic situation that, unfortunately we are all living at the moment.


About a month ago, I started making fabric masks, as a necessity, because we couldn't buy them in the pharmacies - they were sold out and of course, the medical facilities needed them more then ever.
I saw on the internet, especially Instagram, that in many countries that were firstly "attacked" with this nasty virus, people started making different kinds of fabric masks, so I started testing and trying different kinds of patterns.

The one that I liked the most, was kindly sent to me from a fabric friend on Instagram - Nida and here, I am bringing the pattern that I slightly changed (mainly regarding the filter placement opening).
I really like the fact that it sits on the face nicely, and the nose part is nicely covered, without use of additional wire, but it can eventually also be added.

There are also  many tutorials providing different kinds of elastic or tie options, and I suppose that it can depend on the personal preferences, availability or maybe even some strict rules, that certain facilities have set as parameter or best solution.

Art Gallery fabrics collected and shared many useful and helpful info regarding some fabric facts and also different pattern options on their newly created webpage, so I suggest that you look at it.

Here's the printable fitted face mask PDF pattern. You can find the IGTv video HERE


In case that you don't have the printer at home, I am attaching here also the original pattern I got from Nida, that is very easy to be drafted, following the measurements she provided.


My youngest daughter Bianka (modelling her homemade masks), helped me a lot in making and sewing masks and also created the video for how to make it (by herself!), and you may find it on my Instagram and as my first ever IGTV.

Happy sewing!
Katarina