I was certain that I had already created a post about the release of my latest Florence fabric collection, but I suppose I was mistaken and confused it with my newsletter.
Great thing is that the Look Book is also out and it's full of inspirational projects and ideas!
Trying to capture the beauty of the Italian city of Florence and its masterpieces from the high Renaissance period, Florence is another sightseeing venture through this collection’s painted florals and geometrical details. This collection celebrates some of the most significant paintings, sculptures, and architectural details from the city’s major museums and buildings, such as Duomo, Uffizi, and Palazzo Medici-Riccardi. The color palette in earthy terra-cotta tones with contrasting sky blues is drawn from Botticelli’s paintings—an ode to beauty, divine love, and the richness of the world.
Must say that among my favorites is a version of my Duomo quilt pattern created by my friend Sue.
I hope that I will have time to create a wearable version of it.
I also created a set of bags for the look book and the Birdie bag is my favourite bag, created 12 yrs ago for the first time and can be found as a free downloadable pattern with tutorial in this post.
This last one is my favourite Marta shopping bag, as it's reversible and so huge, can carry a lot.
I can not wait to see more projects created with Florence, I hope this may inspire you as well!
Ever since I visited the enchanting Duomo in Florence, I knew I had to translate that beauty and all the inspiration into something...and one year later, my Florence fabric collection is almost here as well as the quilt pattern that was inspired with that beautiful marble facade.
Here's the mock-up I did in Twin 1, using only 4 prints from the Florence fabric collection, that looks like a meadow garden to me! My plan is to fussy cut the central squares from the Florence (city) print.
And here's the THROW II in same fabrics:
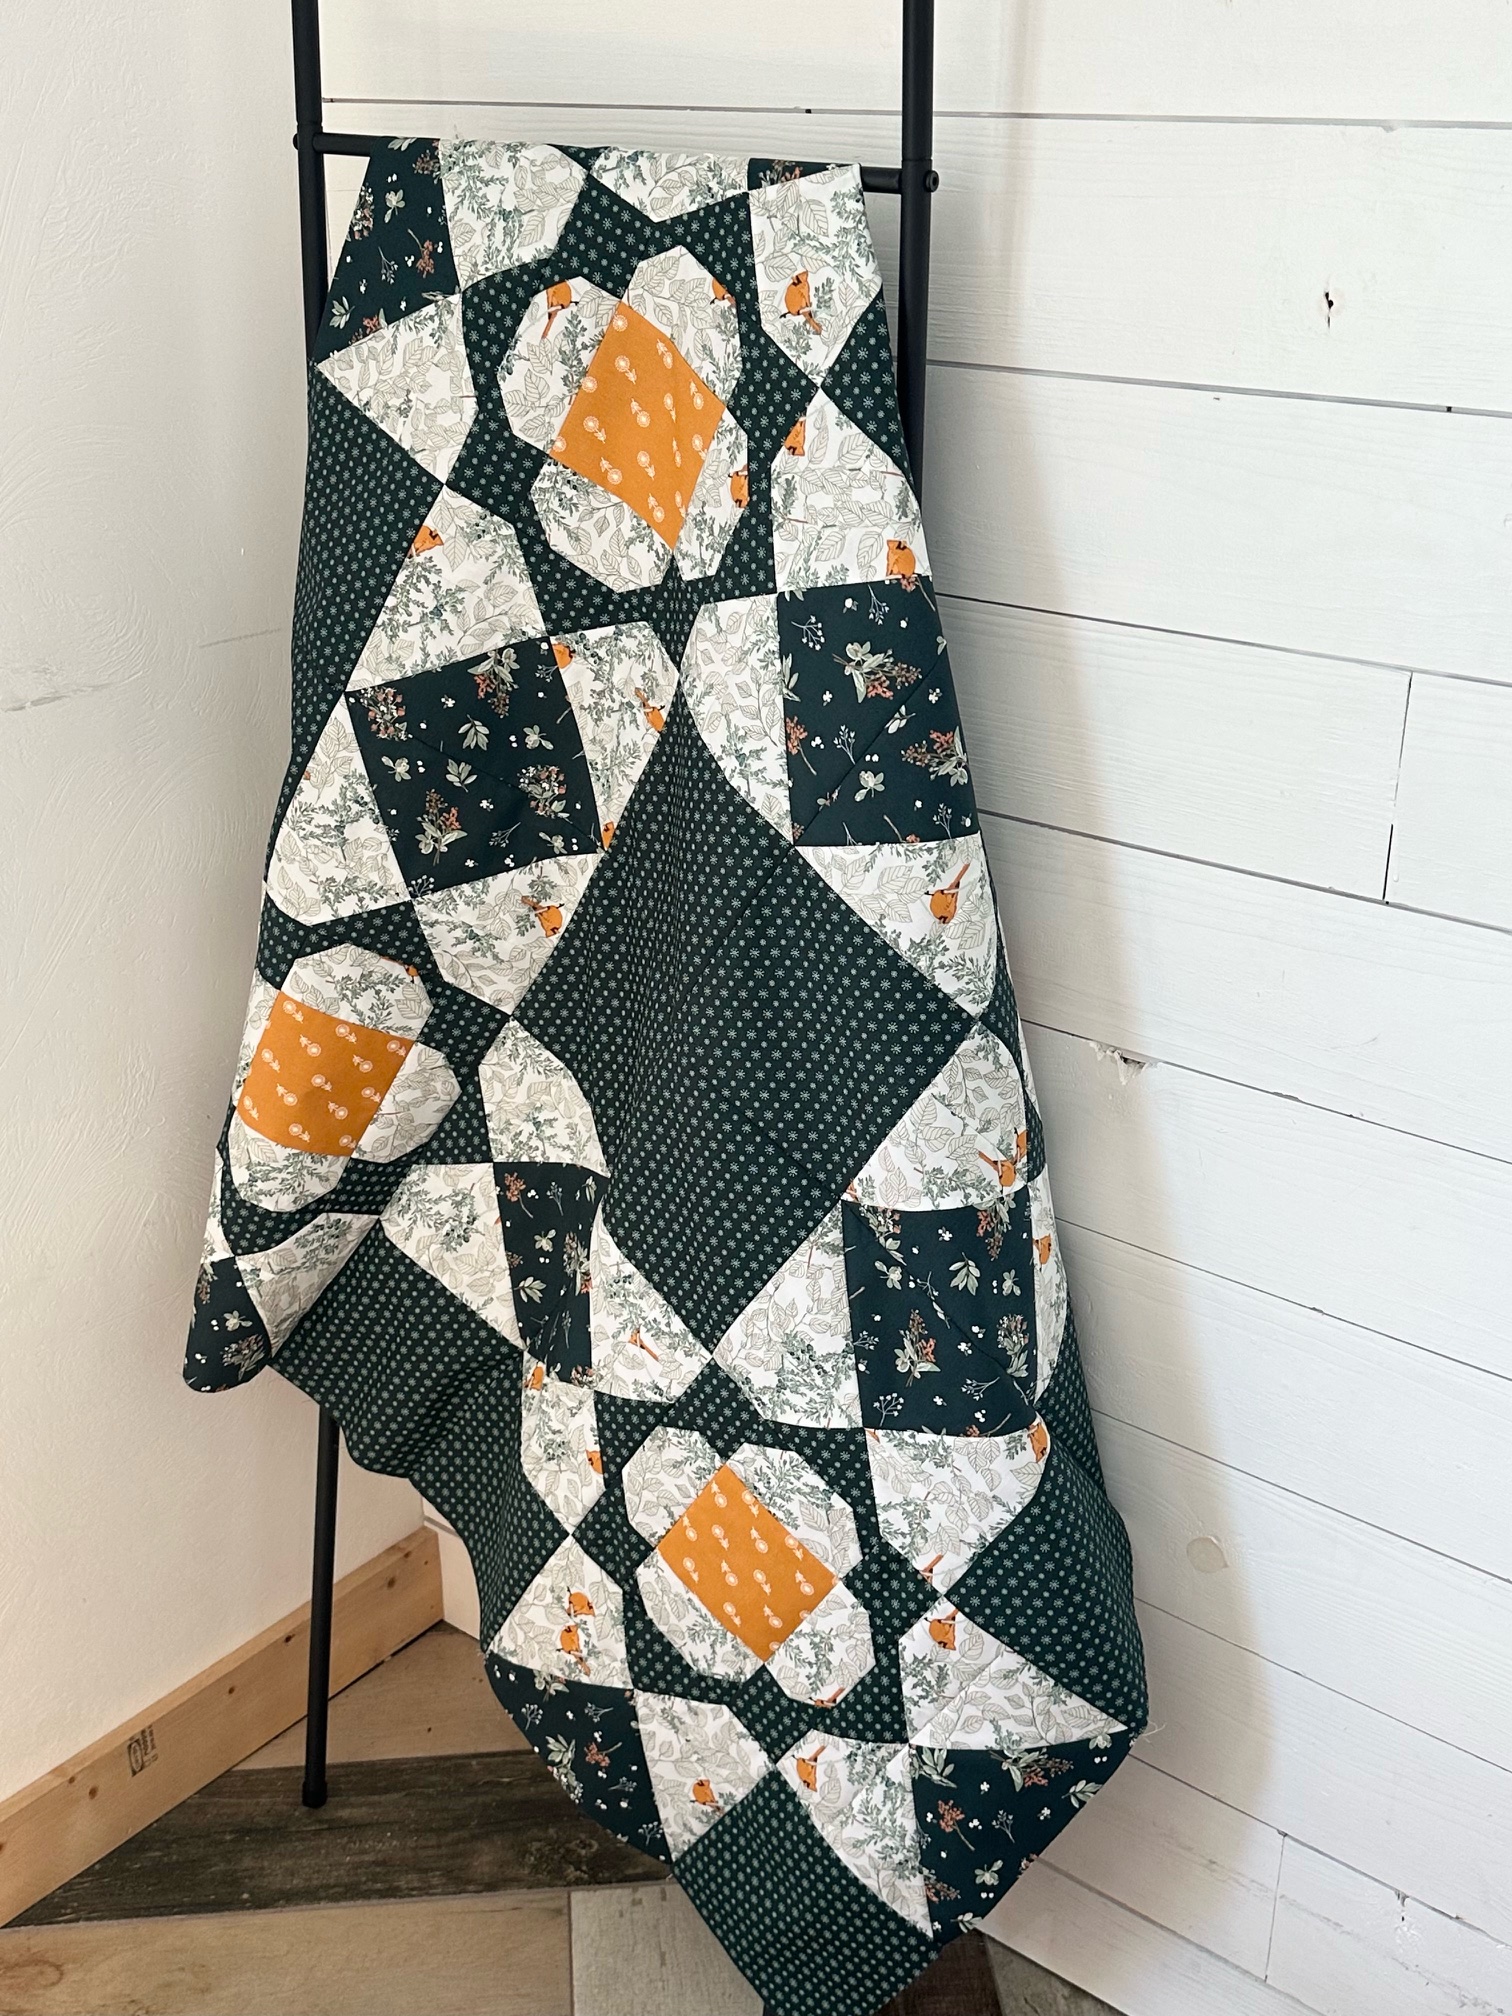
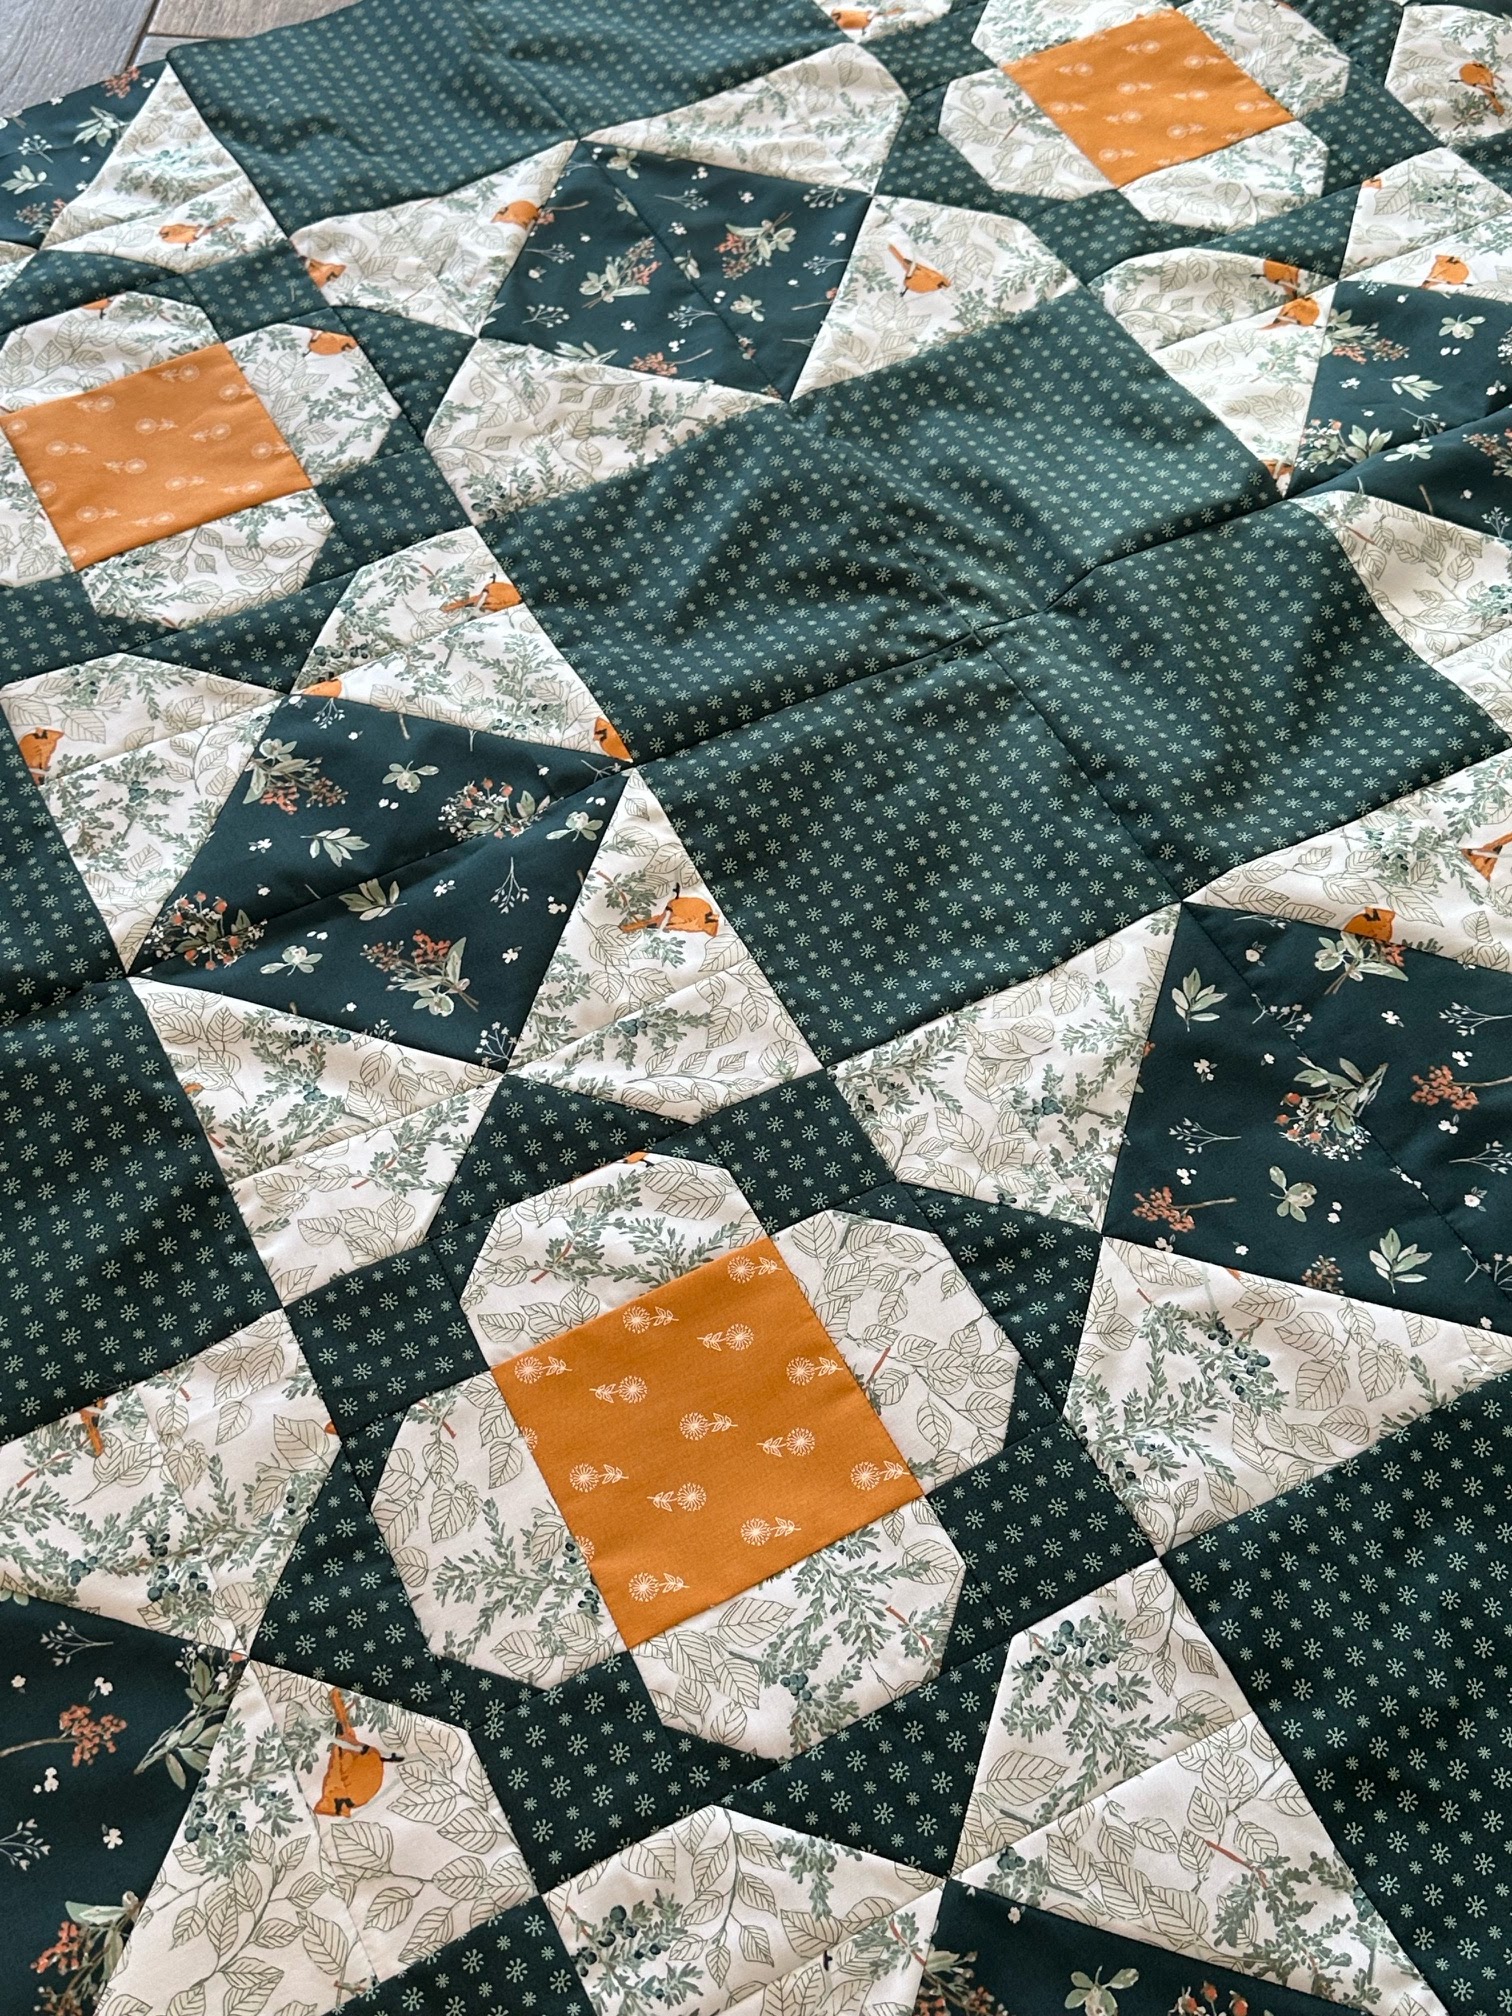
As my Florence fabrics aren't here just yet, I had to use my Wintertale fabric collection, which turned out great, as now I have a beautiful quilt ready to be gifted, just in time for the Holidays. I used flannel backing and can't be more thrilled about this choice!
And I hope that you will join me in my Quilt-along during the month of November by subscribing here, (the subscription box is on the right of my blog) or by visiting my websitewhere you can get the subscription box with a pop-up window or there's the area reserved for that at the bottom of my website's landing page.
Here are the requirements:
QAL schedule:
·Week One, November2 - Prep: Choose + Cut Fabrics
·Week Two, November9 - Make units and sub-blocks
·Week Three, November16 - Make blocks
·Week Four, November23- Quilt top assembly
·Week Five, November30- Finishing
Some more mock-ups:
THROW II in Seedling
And here are some of the beautiful testers versions:
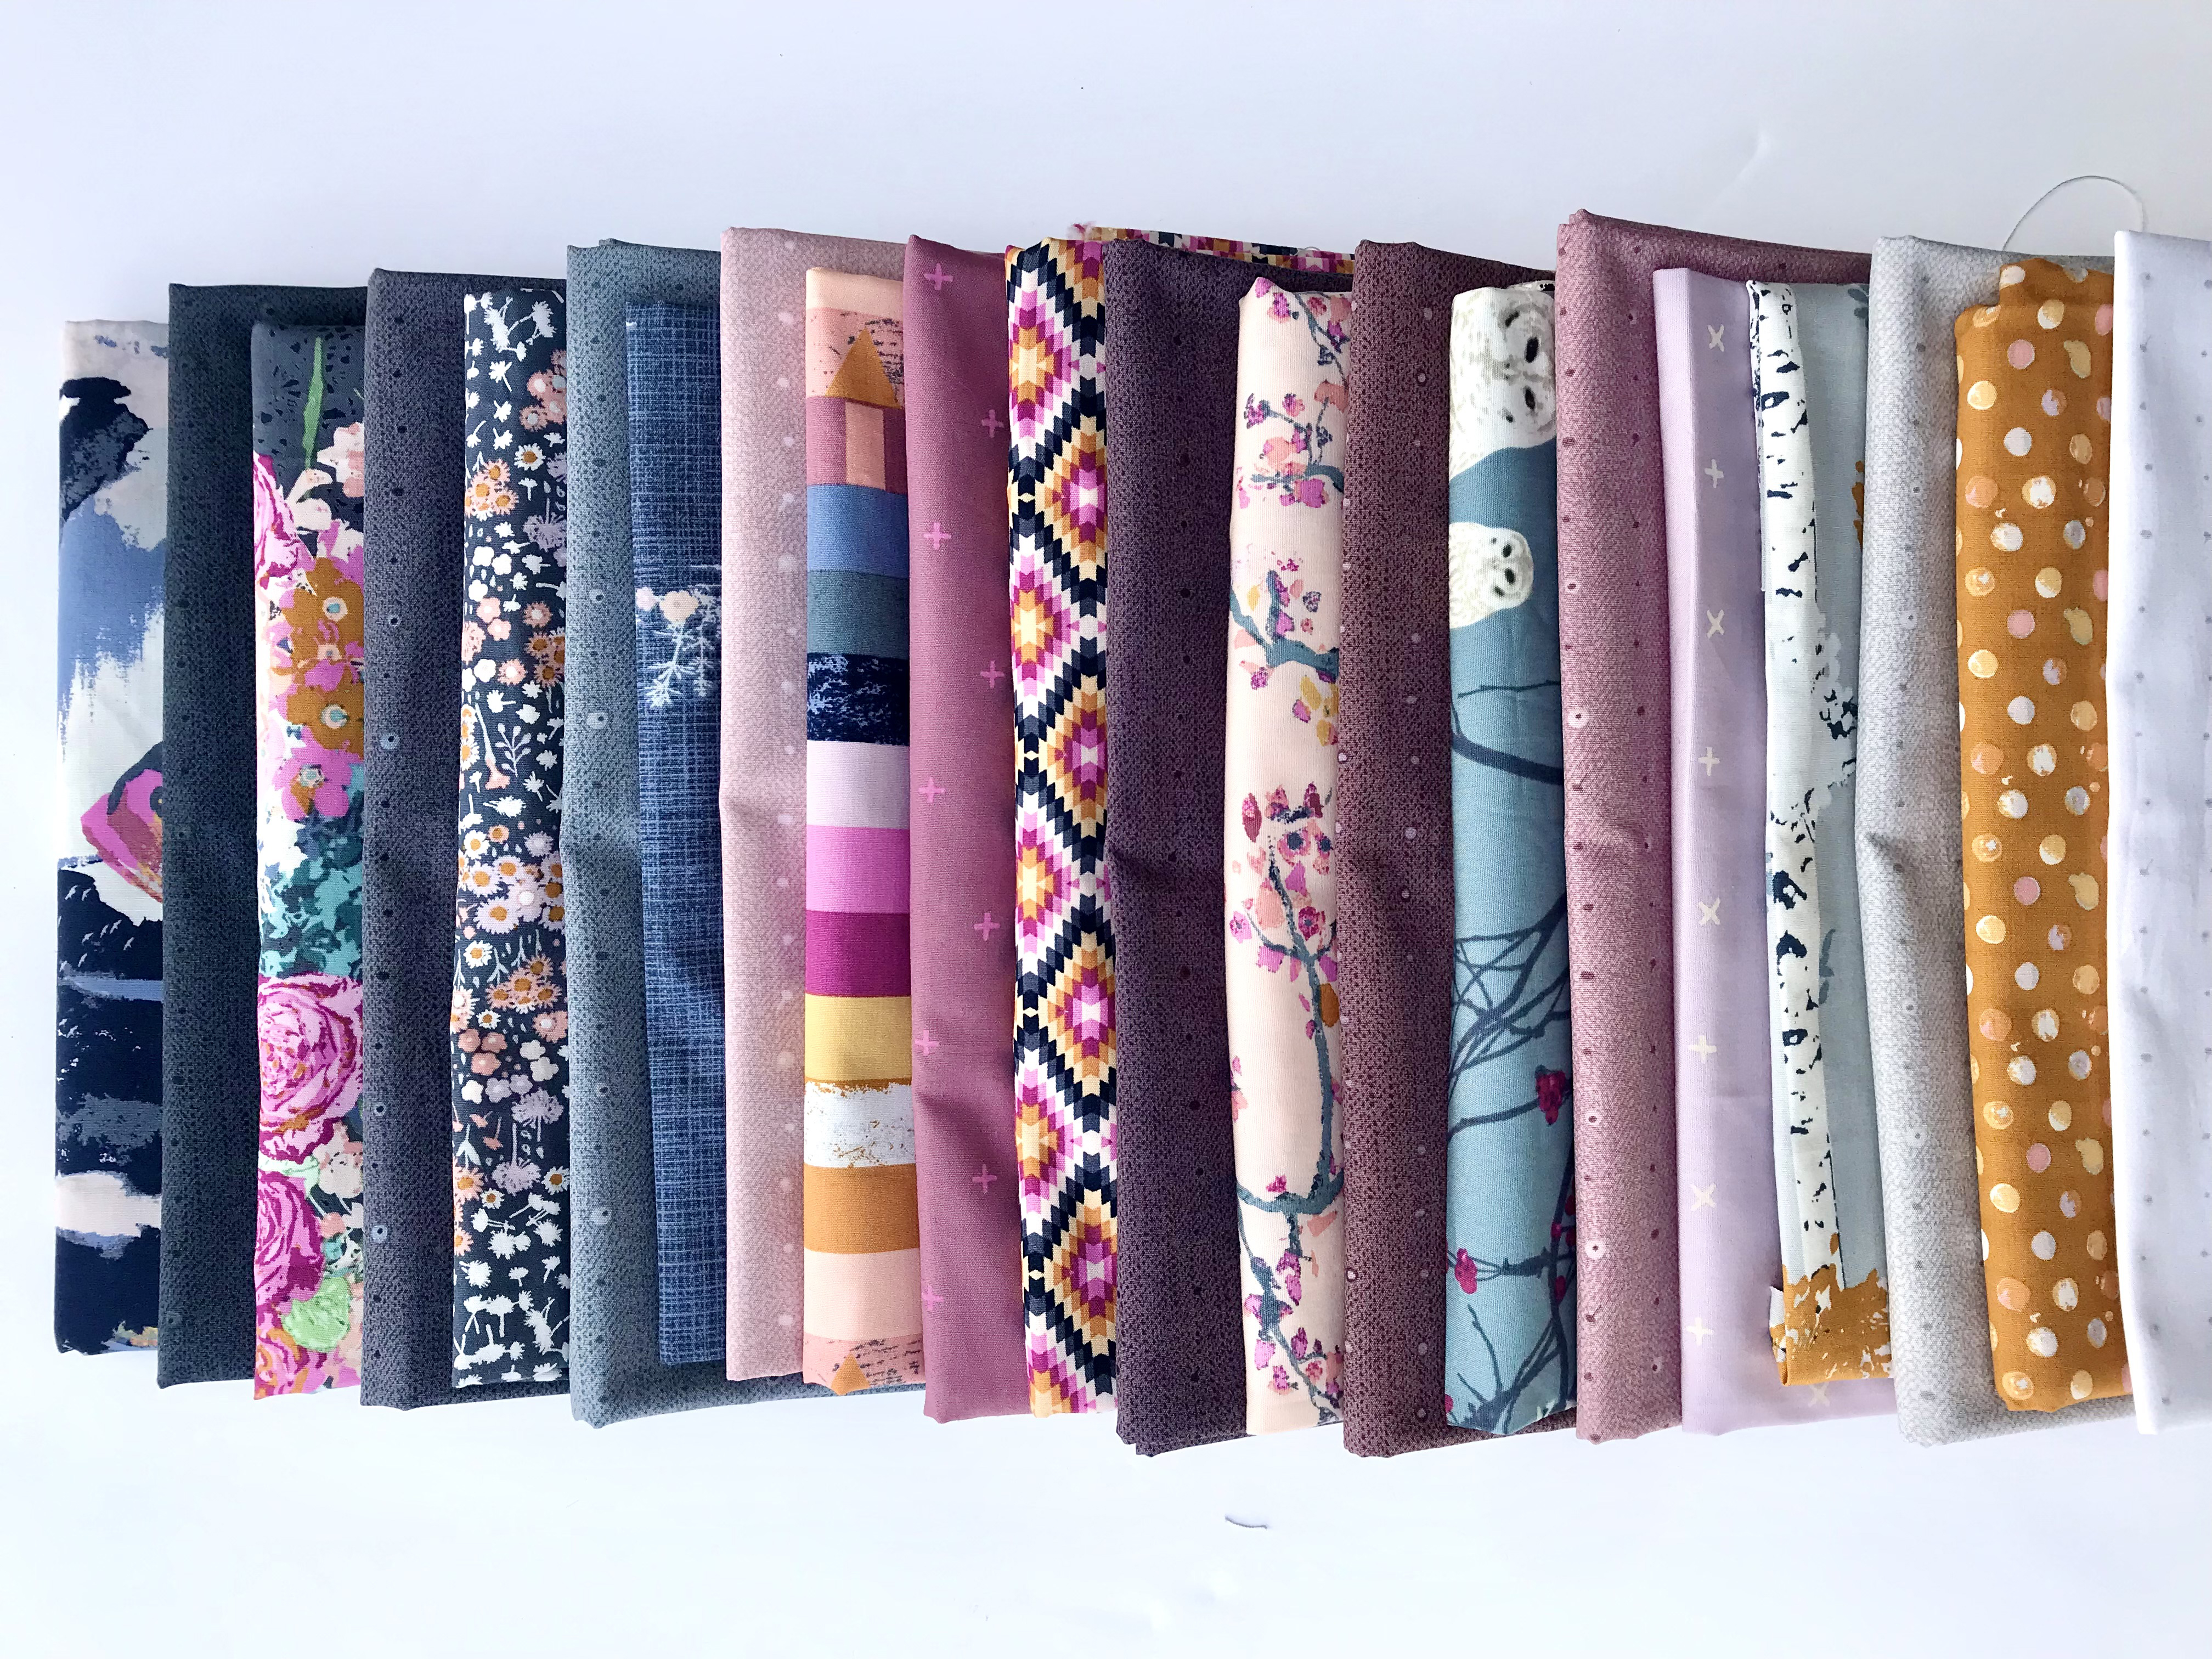
Seedling is my first designer essentials-blender collection with Art Gallery Fabricsand I just can't be happier of how it looks.
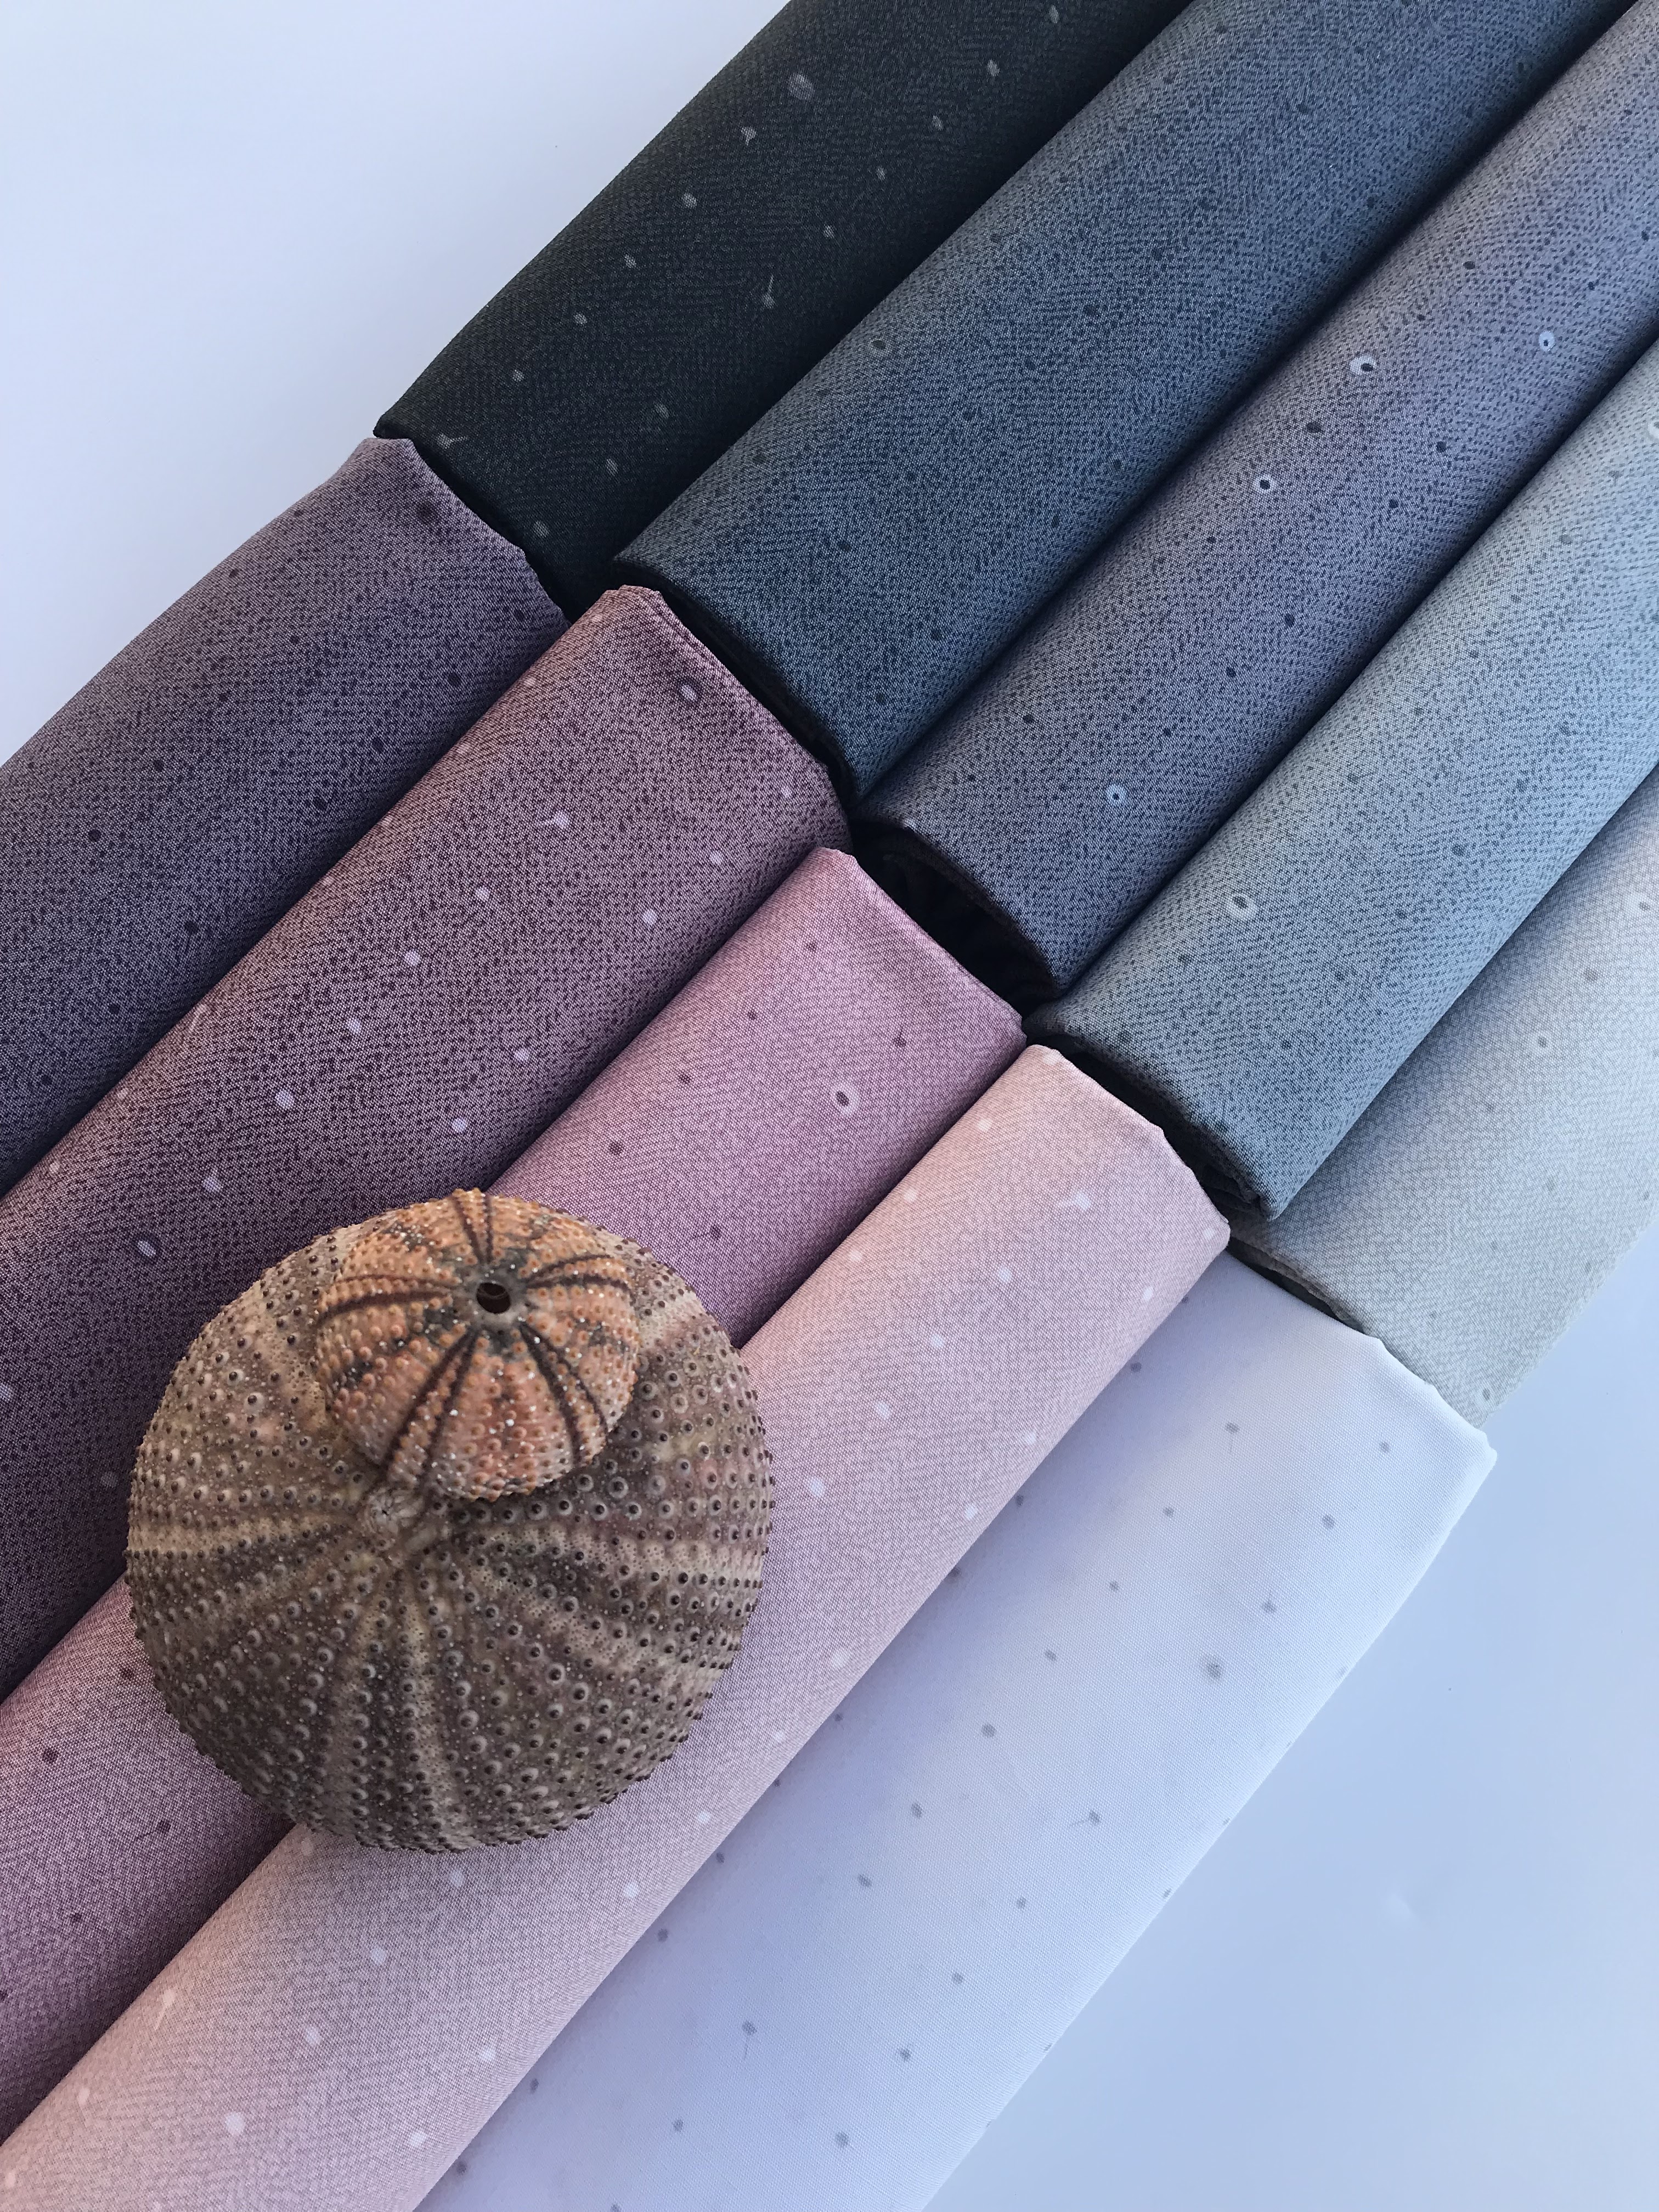
It features 10 prints in mineralshades from white, sandy beige neutrals and mauve to deepest gray and steely blue. It's printed on regular poplin cotton, just like any other AGF collection, but has a subtle designed texture that gives a feeling like it's a woven substrate (when it's not). It provides limitless possibilities of mixing and matching, whether used as a collection on it's own or as a blender/companion print to other textiles.
The design element-little seeds are spread on the textile surface, like little dots, but if you look closer, you may notice that these are all like little seeds and sprouts.
Some are closed in little pods, which are giving an optional and additional pop of design and color.
These little seeds, almost like planted on the surface are like little dashes of hope, and hence the name of the collection-Seedling.
This simple print was originally printed as part of my Twenty fabric collection last year in two colors: white -Gridded seeds in Pure and and green/blue: Gridded seeds in Mineral. These two prints don't have the textured design-background, so that's the main difference with their sibling prints from Seedling.
Not only that it goes beautifully with Mindscape, but it works perfectly well with so many prints from my previous fabric collections, as well with many other prints and collections by other designers.
Here is pictured together with Eclectic Intuition, my Tribute fabric collection.
Here are some more pictures....
I am so excited about the possibilities and looking forward to the look book, coming out soon!
Patchwork hoodie, as a sort of quilted coat or jacket was something that I always wanted to make.
And ever since I created this coat 13 years ago (how is that possible?), I had a desire to make something similar, even because that coat was over-worn and loved so much that the fabrics started to show many signs of that. And that was the period when I didn't know anything about patchwork and quilting, so I used the fabrics that had that collaged vibe.
So, back to the actual hoodie - I searched for a pattern that was featuring raglan sleeve (a sleeve that extends in one piece fully to the collar, leaving a diagonal seam from underarm to collarbone) and Burda's 6718 pattern was just what I needed. I think that even this free pattern can be great, but the sleeve type just wasn't the one I wanted to do for this particular patchwork style and I think that raglan sleeves are really even beginner friendly.
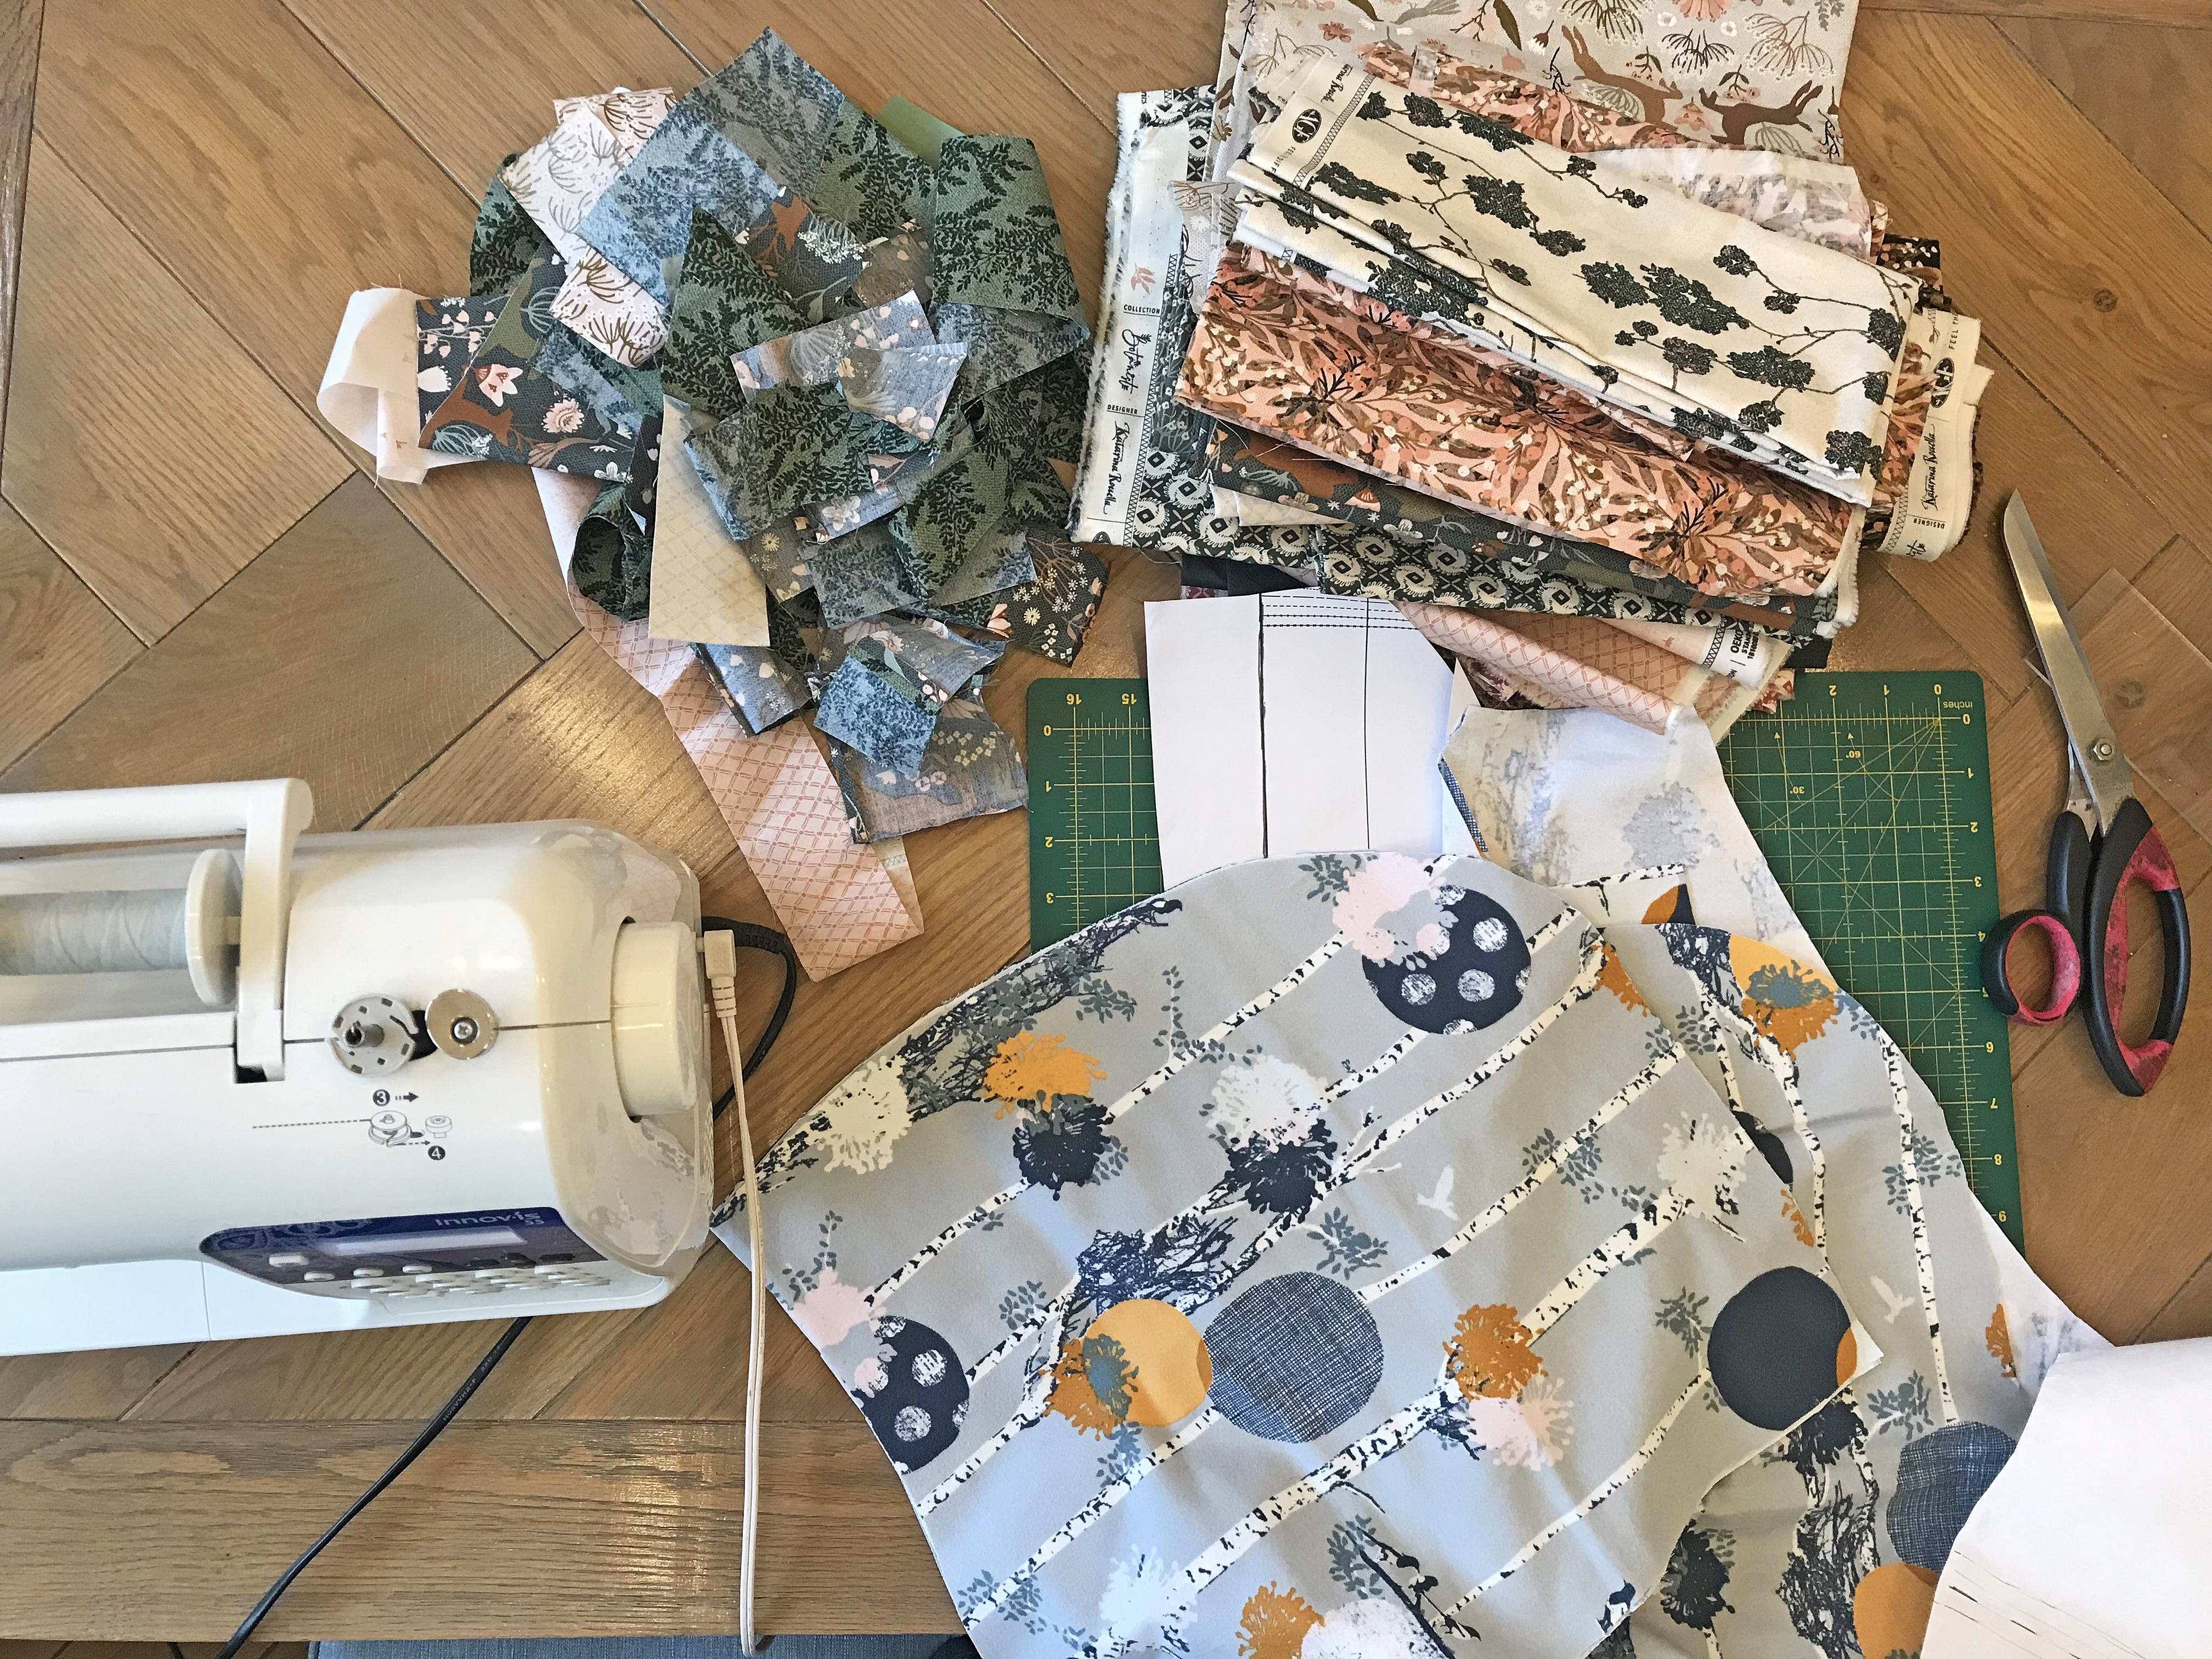
I used my "Stamped Grove" flannel as a base to sew my patchwork pieces to it. I was planning to use a matching "Woodlandia" flannel from the same, Botanist collection as the rest of my fabrics, but shipping problems just didn't allow that.
And yet, as that backing or inner part of the hoodie isn't visible, it really doesn't matter. You can use even any kind of plain flannel or even cotton batting (or both to add an extra level of coziness).
Beside fabrics for patchwork and flannel for the base or lining, (calculate at least 2-3 yds in total for the patchwork-outer part and the same for the lining) you will need around 1.5-2 yds of the trimming for wrist cuffs and waistline or some kind of jersey fabric that can be cut in strip, folded and used as ribbing. You can also add the eyelets and a cord within the hoodie part- as the pattern provides.
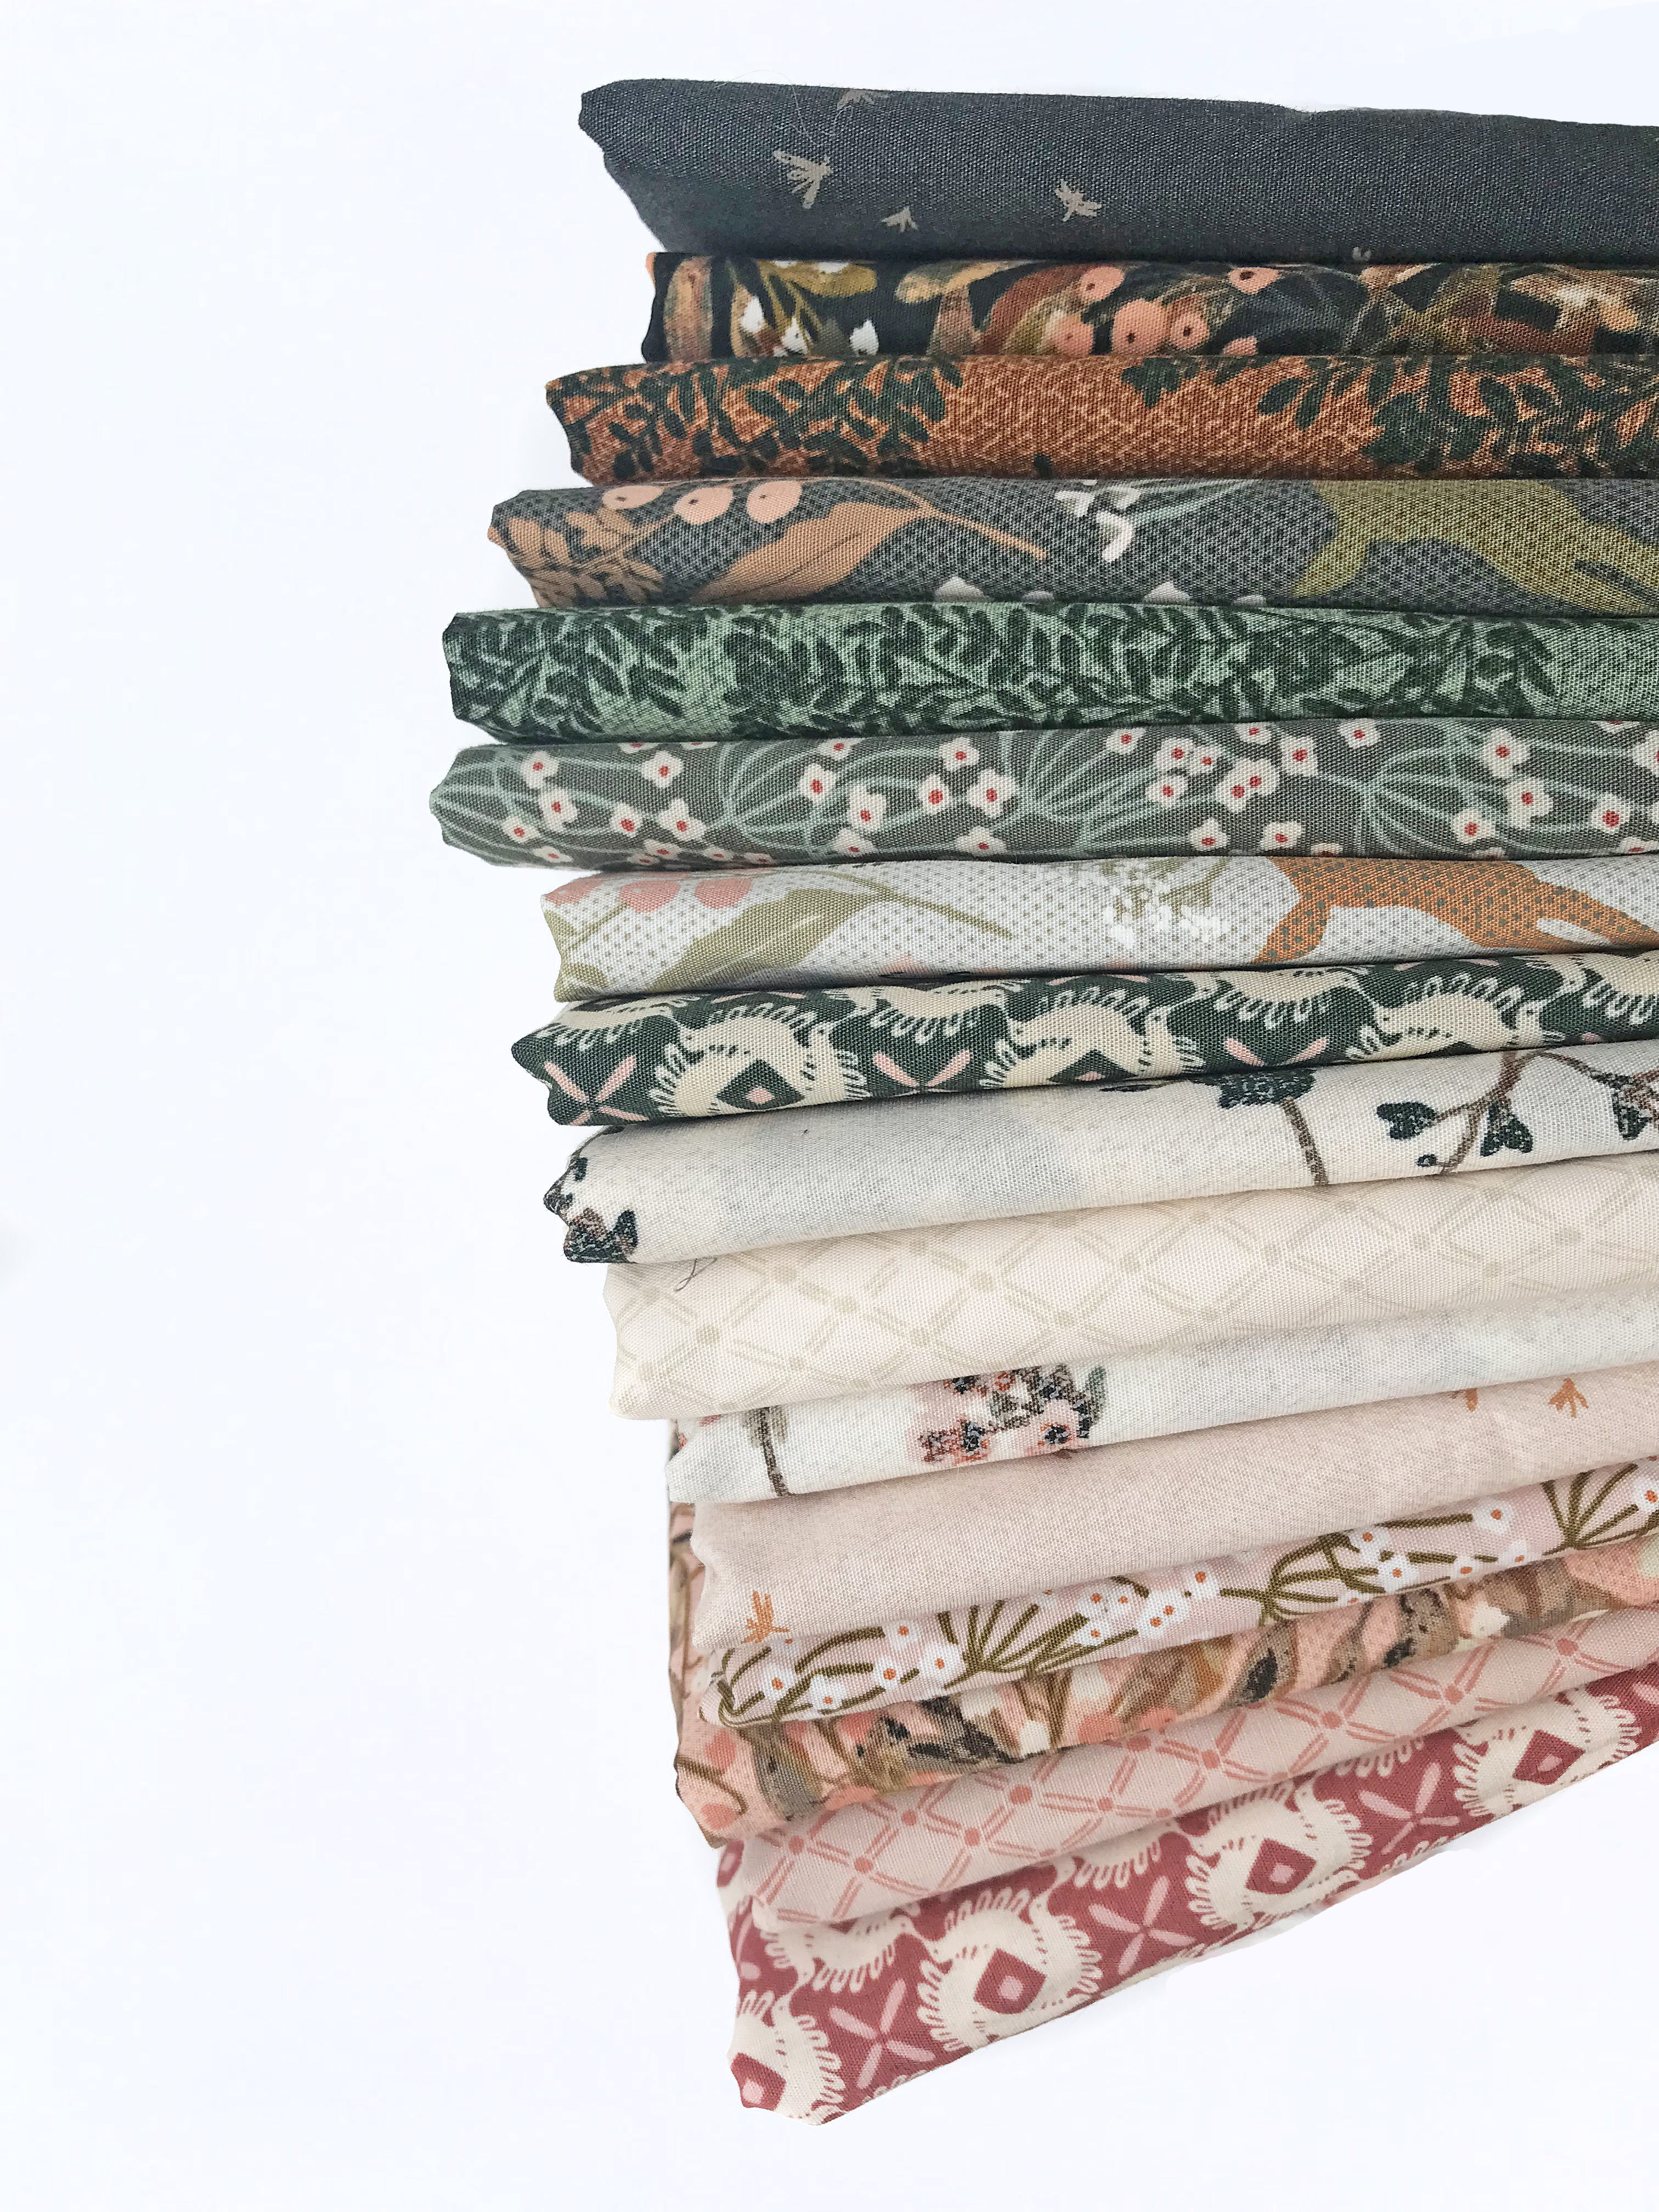
The first thing to do is to decide on the fabrics you will use, in my case it was easy as I had my collection that was already curated like that so I just added a few pure solids to add some colorful accents and a bit of whimsy. This hoodie was planned for my son, who's modeling it, but I think that I will find a way to steal it :)
As this all started as an experiment (it was the first time to use this pattern and also this method), so I really wasn't sure what I will get and how satisfied I will be with the result. But I can say that I am very excited about it, loved the process and I am already looking forward to the next one.
What I have learnt is that the pattern itself (all Burda patterns don't have the seam allowance calculated, so you need to add them) can run a bit small but only due to the fact that the materials used for this project aren't stretchy like usual knit fabrics that are used for hoodies. So, even if this is the Men's pattern and my 18 yrs old son (almost 180 cm height) is wearing an M, I used the last available size marked lines to cut all my fabrics - I believe it would be like an XL. Next time, I will add just a tiny bit to it, except to the hoodie-head part itself. And I will round it a bit better. But everything fitted nicely and I absolutely didn't have any issues, so I can highly recommend it!
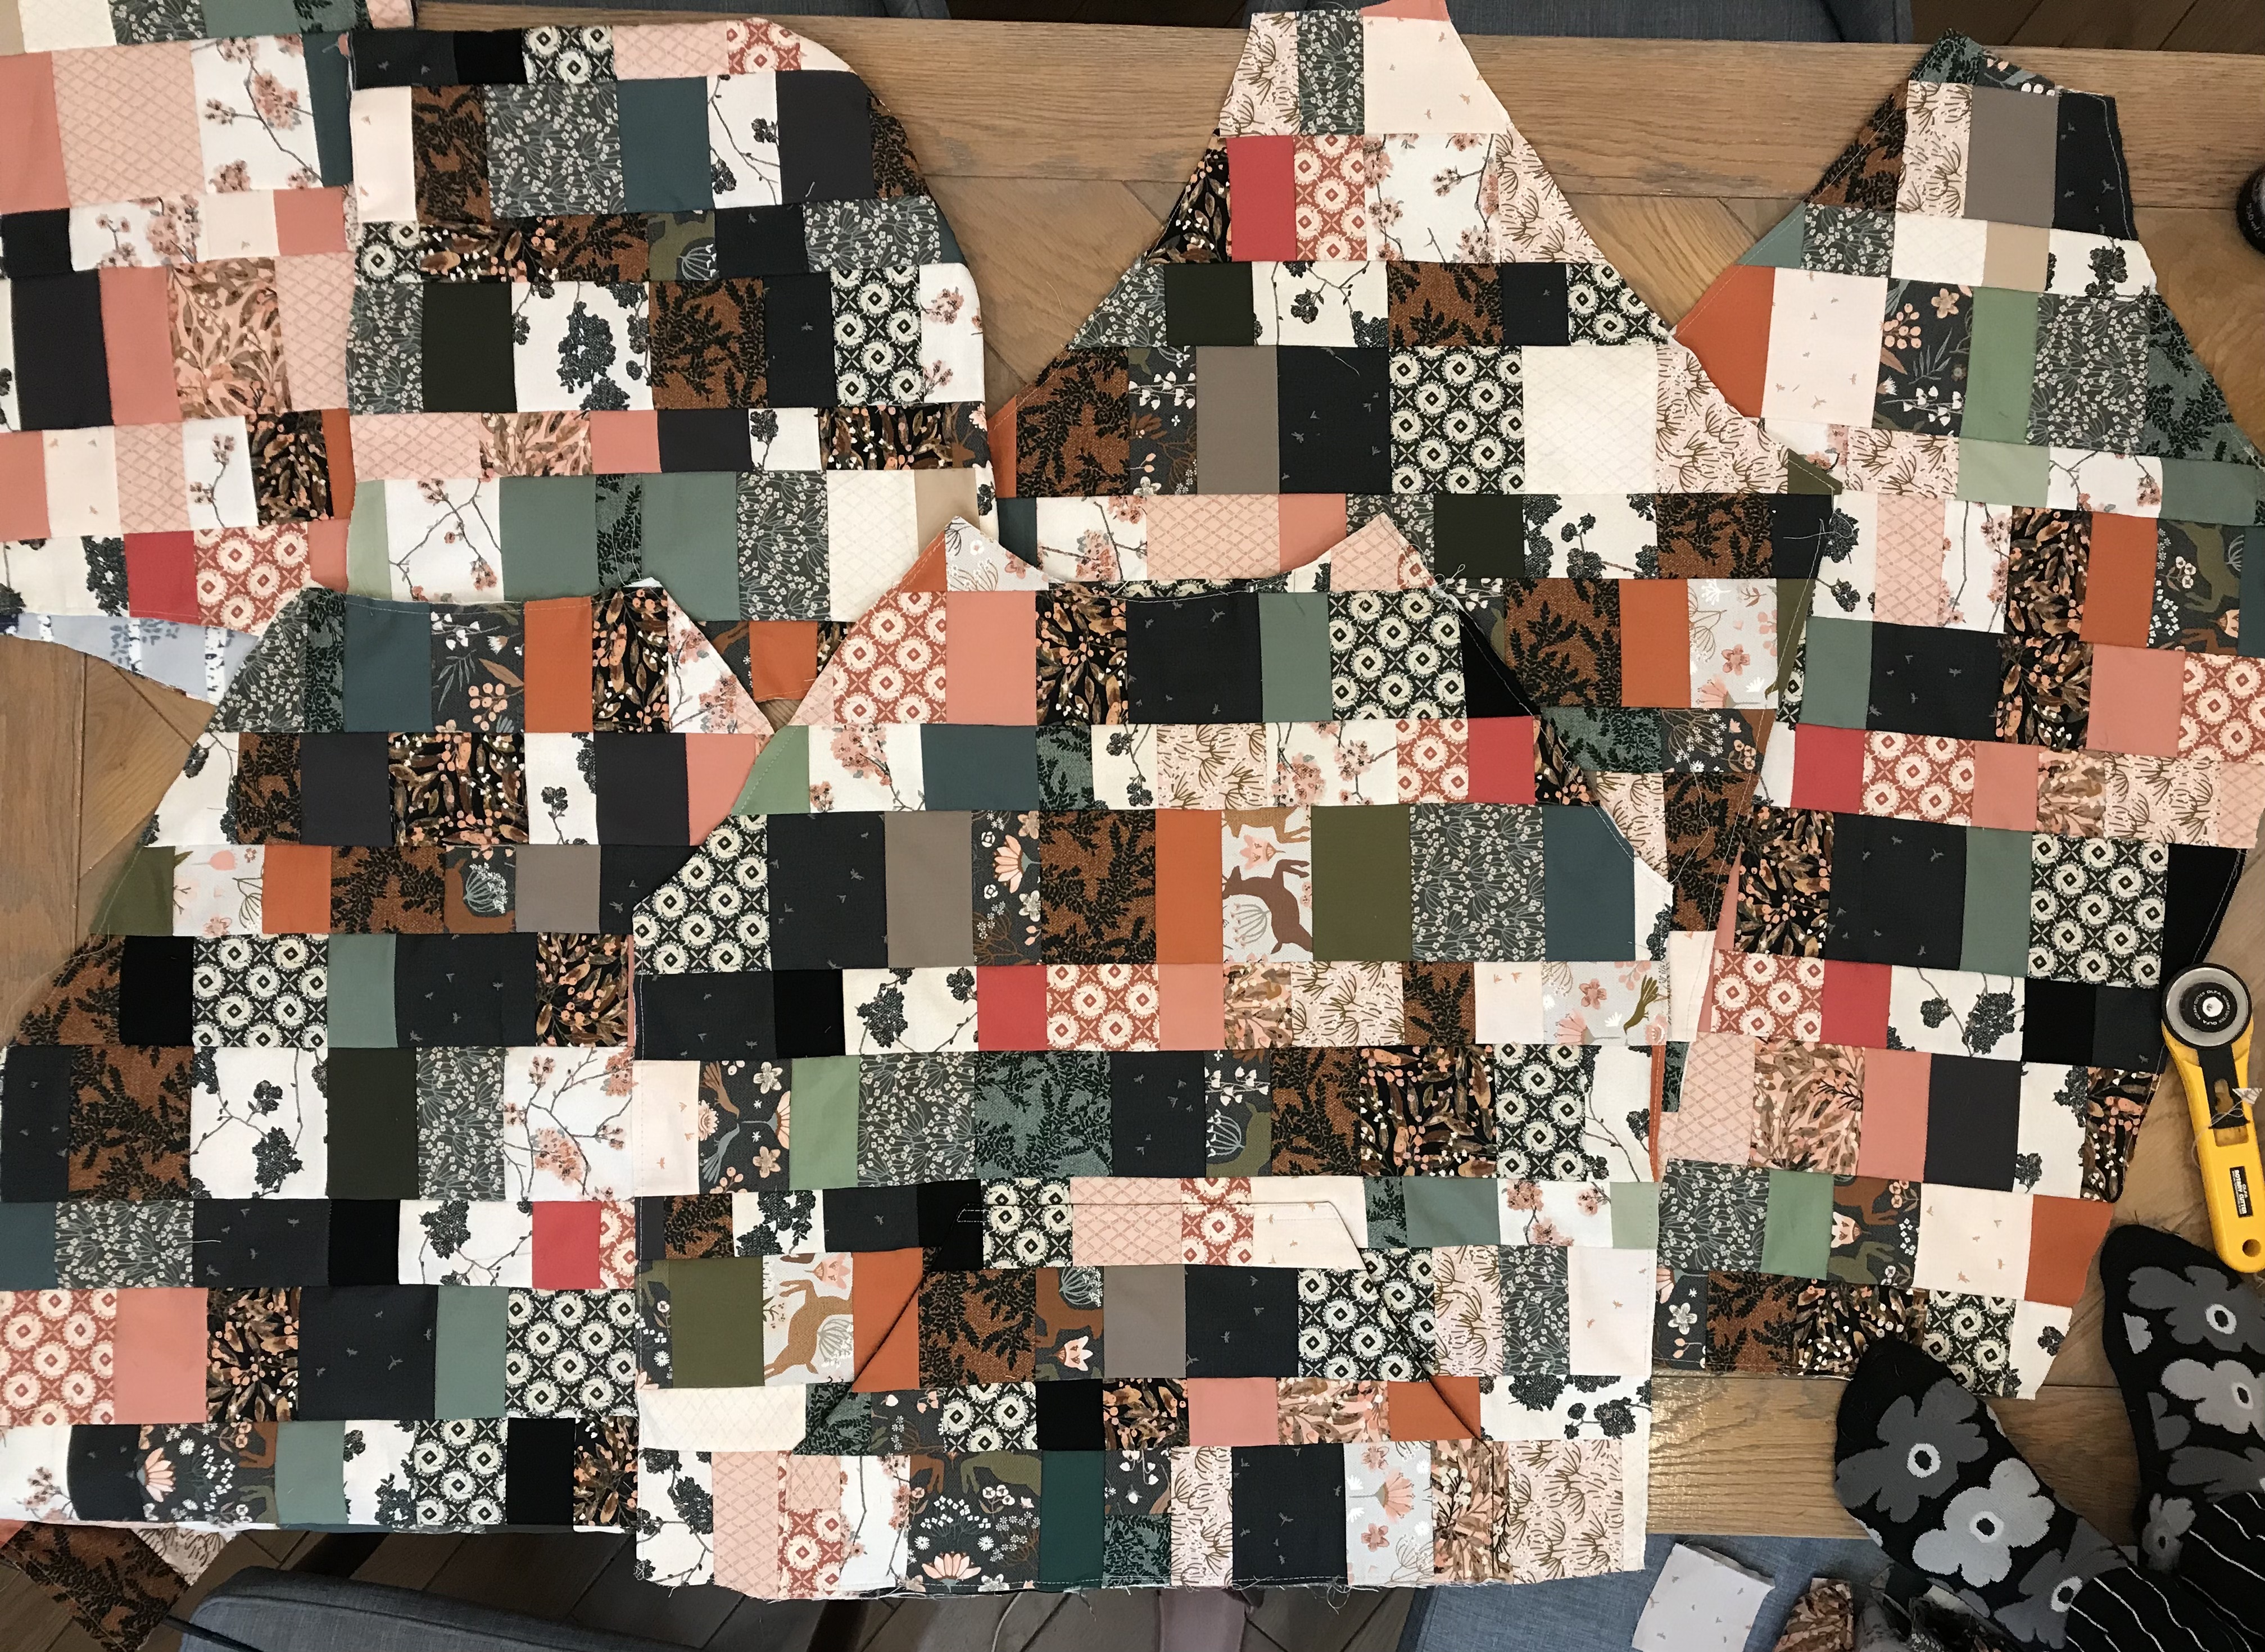
I was driven by the quilt as you go method to assemble the strip sets that I organized in rows.
From all the fabrics I wanted to use, I have cut 2", 2.5", 3", 3.5" and 4" wide strips. At least 2 strips of each of 16 fabrics + around 10 solids.
So I think that a fat quarter bundle of a collection that has at least 10 assorted prints would be fine for one hoodie-for the external, or top part.
With the fabric strips I made the random strip sets, combining fabrics in no particular way. Some strip sets were longer, some narrower, some shorter, so really just upon liking. I also had some leftovers from my previous project: Winterflake quilt and it was great to use them too. So I think that any patchwork or quilt bock leftovers can be great for this type of hoodie.
After making the strip sets, I have cut them into same 2", 2.5", 3", 3.5" and 4" increments-strips (on the 90° from the pieced seams).
I started from the bottom parts of the cut flannel pieces, adding strips in rows, going up, trying to maintain good alignment. I draw a few horizontal lines to guide me additionally. Flannel was very good option for this as it would nicely adhere quilting cotton strips, so I didn't have to press my rows with iron frequently.
The first thing I did was the smallest - the front pocket. After finishing the exposed, patchwork side of the pocket, I have lined the pocket with another plain piece of fabric, as I thought that it would be better and cleaner than just sewing the pocket to the front hoodie part over folded edges.
I started to sew the patchwork strips on the front hoodie part according to the same pocket strip order, as I wanted to have "invisible" transition.
Here are all the hoodie pieces before final assembling.
I made a video where I tried to gather some small video clips and pics that I took during the sewing and assembling, as it may be easier to understand.
I really hope that you may find this inspiring and I really think that this is amazing way to use some loved fabric scraps and quilt blocks and leftovers! And I think that it's easier than making a jacket or coat, so maybe worth trying before sewing something a bit more delicate.
My son loves it so much and I am sure it will be a show stopper 😎
(I am missing so much the period when my kids were small and actually wanted to wear some mommy made clothes, so this was such a wonderful request and honor for me to make🤟)
Hi! I'm proud mama of 3 gorgeous kids that are true inspiration for my work. I love to create and express myself through many forms of art: collages, drawings, illustrations, calligraphy, graphic design, textile and surface design, printing, photography, sewing.....


.jpg)


 GRID
GRID
 DECADENCE


