Quilting is an art form that transcends time, continually inspiring in creativity and expression. Among the myriad of quilt block designs, the half log cabin block stands out as a classic yet versatile pattern that invites quilters to explore endless possibilities.
What is the Half Log Cabin Block?
The half log cabin block is a variation of the traditional log cabin block, characterized by its unique construction and striking visual appeal. Unlike its full log cabin counterpart, which features strips of fabric sewn around a central square, the half log cabin block employs strips on only two adjacent sides, creating a captivating asymmetry.

The Beauty of Half Log Cabin Block Piecing
The magic of the half log cabin block lies in its simplicity and adaptability. By playing with fabric placement, color gradients, and strip widths, quilters can achieve a myriad of effects, from subtle gradations to bold contrasts.
1. Color Placement: Experiment with light and dark fabrics to create depth and dimension within the block. Consider using a cohesive color scheme or mixing contrasting hues for a dynamic visual impact.
2. Strip Width Variation: Varying the width of the strips adds visual interest and texture to the block. Combine narrow and wide strips to create intricate patterns and captivating movement.
3. Gradated Effects: Explore the possibilities of creating gradated effects within the block by arranging strips in a strategic sequence. Transition seamlessly from light to dark or vice versa to achieve a harmonious gradient.

Tips for Half Log Cabin Block Piecing
While the half log cabin block offers boundless creative opportunities, mastering the piecing process is key to achieving flawless results. Here are some tips to guide you along the way:
1. Precision Cutting:
Accurate cutting is essential for achieving clean, straight edges in your blocks. Use a rotary cutter, ruler, and cutting mat to ensure precise measurements and clean angles. If possible, cut fabric strips lengthwise instead of crosswise.
Minimizing Stretch:
The lengthwise grain of the fabric has minimal stretch compared to the crosswise grain or bias. Cutting strips for your log cabin blocks along the lengthwise grain helps maintain the stability and integrity of the fabric, reducing the risk of distortion during piecing and pressing.
Preserving Block Shape:
Fabrics cut along the lengthwise grain retain their shape better, resulting in more precise and uniform log cabin blocks. This stability ensures that the blocks maintain their intended size and shape throughout the quilting process, contributing to the overall accuracy and appearance of the finished quilt top.
2. Consistent Seam Allowances:
Maintain a consistent seam allowance throughout the piecing process to ensure uniformity and prevent distortion. Consider using a quarter-inch foot or marking your sewing machine to guide your stitches and/or use magnetic seam guide.
I strongly suggest using SCANT seam allowance. Fabric thickness, thread thickness, and pressing techniques can all contribute to slight variations in seam allowance. A scant allowance compensates for these factors, resulting in more accurately sized quilt blocks.
How to Achieve a Scant Seam Allowance:
Adjusting Sewing Machine Settings:
Use the markings on your sewing machine's needle plate as a guide for seam allowance. Align the edge of the fabric with a line slightly less than the desired seam allowance.
Some quilters find it helpful to move the needle position slightly to the right, ensuring a scant allowance without relying solely on the machine's markings.
Test and Adjust:
Practice on scrap fabric to determine the ideal seam allowance for your machine and fabric combination.
Measure the resulting seam allowance with a ruler or seam gauge to ensure it matches the desired measurement.
Consistency is Key:
Maintain a consistent scant seam allowance throughout your project to ensure uniformity in block size and alignment. Pay attention to seam allowances at the beginning and end of stitching lines, as these areas are prone to variation and can affect block accuracy.
3. Pressing Technique:
Press your seams carefully and consistently (without stretching or distorting the fabric) after each step to set them in place and reduce bulk. Consider pressing seams open for a flatter finish, particularly when working with multiple layers of fabric. Use a hot iron, without steam and firm pressure to ensure seams lie flat and open, minimizing bulk and creating crisp, precise blocks.
4. Starching the fabrics:
Using starch in log cabin piecing can be a helpful technique for achieving precise and crisp results. Here are some tips for using starch effectively:
Choosing the Right Starch:
Opt for a starch product specifically designed for fabric use, as these formulations are gentler on fabrics and provide better results.
Consider using a starch alternative like sizing or starch alternative spray for a lighter finish.
Application:
Spray a light, even layer of starch onto the fabric, holding the starch bottle approximately 6-8 inches away from the fabric surface.
Avoid saturating the fabric with starch, as excess starch can lead to stiffness and difficulty in handling.
Drying:
Allow the sprayed fabric to air dry or use a pressing cloth and iron to dry the starch. Use a low to medium heat setting to prevent scorching or damaging the fabric fibers.
Pressing:
Once the fabric is dry, press it with a hot iron to activate the starch and set the fabric. Use firm, even pressure to ensure the starch penetrates the fibers evenly.
Press from the wrong side of the fabric to prevent leaving starch residue on the iron's soleplate.
Handling and Piecing:
Starched fabric tends to be stiffer and more stable, making it easier to handle during cutting and piecing.
Take care not to stretch or distort the starched fabric while handling, as this can affect the accuracy of your piecing.
Accuracy and Precision:
Starched fabric provides crisper, more defined edges, which can help maintain the integrity of your piecing lines and ensure precise seam allowances.
Use starch particularly for bias edges and intricate piecing patterns to minimize distortion and maintain shape.
By following these tips, you can harness the benefits of starch to enhance the accuracy and quality of your log cabin piecing, resulting in beautifully crafted quilt blocks and projects.
Embarking on HALF LOG cabin block piecing
Now that you're equipped with the fundamentals of half log cabin block piecing, it's time to embark on your quilting adventure.
All the fabric strips were cut in 1.5" x WOF strips (it's even better if you can cut them in LOF (length of the fabric direction as explained before) and then subcut and pieced in following order:
1. 1.5" square in fabric A
2. 1.5" square in fabric B
3. 1.5" x 2.5" rectangle in fabric B
4. 1.5" x 2.5" rectangle in fabric A
5. 1.5" x 3.5" rectangle in fabric A
6. 1.5" x 3.5" rectangle in fabric C
7. 1.5" x 4.5" rectangle in fabric C
8. 1.5" x 4.5" rectangle in fabric A
9. 1.5" x 5.5" rectangle in fabric A
10. 1.5" x 5.5" rectangle in fabric D
11. 1.5" x 6.5" rectangle in fabric D
12. 1.5" x 6.5" rectangle in fabric A
13. 1.5" x 7.5" rectangle in fabric A
14. 1.5" x 7.5" rectangle in fabric E
15. 1.5" x 8.5" rectangle in fabric E
Whether you're a seasoned quilter or a novice enthusiast, the half log cabin block offers a canvas for boundless creativity and exploration.
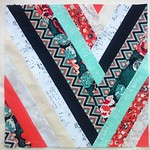
Here's the simple block that I am using for my upcoming, improved Interlude quilt pattern, called Interloud pattern. This block is 8.5" unfinished.
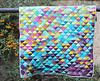
By making and piecing 4 of these together, you can obtain a great pillow or bag front.
This quilt block can be great for using scraps. Just determine the fabric groups by value, for example all the fabrics from the A group (background) will be with light values (whitish), while the B-C-D-E fabrics will be either from the same colour group (for example shades of blue) or all on the darker side, so that they can provide great contrast with the fabrics from the group A(background). Additionally, you can play with gradient, like shown on the piecing diagram.
Have fun!
Katarina


.jpg)



























 GRID
GRID
 DECADENCE























 Posts
Posts

