. . . . . . . . . . . . . . . . . . . . . . . . . . . . . . . . . . . . . . . . . . . . . . . . . . . . . . . . . . . . . . . . . . . . . . . . . . . . . . . . . . . . . . . . . . . . . . . . . . . . . . . . . . . . . . . . . . . . . . . . . .
Showing posts with label doll. Show all posts

Friday, 21 November 2014

Tutorial-pattern for soft fabric Matryoshka doll


I have used this pattern to make cute Nordika doll (Nordika collection by Jeni Baker), that was featured in the December 2013 issue of Sew magazine UK.
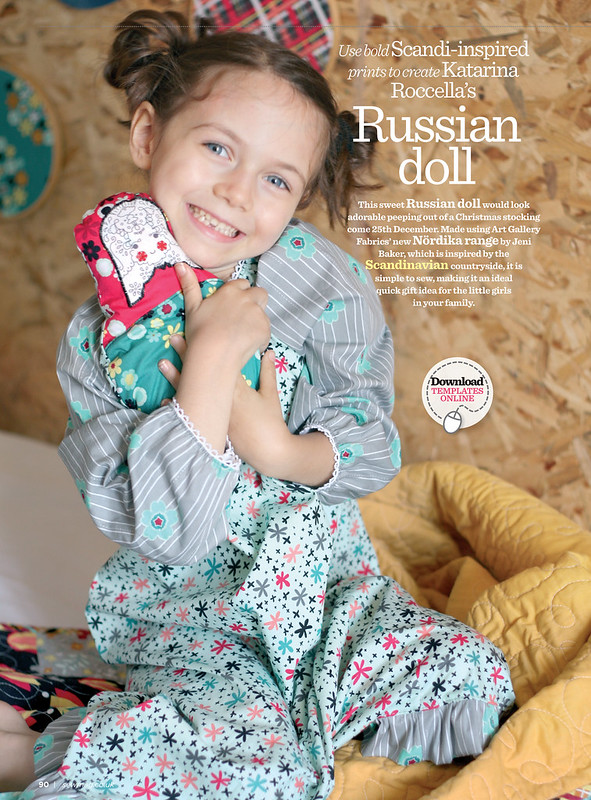
Russian doll page 1

I am thrilled that now I can share this pattern with all of you and that I can use my Recollection line to sew a few dolls.

 Doll dimensions: 7 x 9.5" (17.5 x 24 cm)

 Needed supplies:

1. fabric: this is great project using scraps
2. small piece of heavy weight fusible interfacing (for the face)
3. sewing machine, thread (for the best results - use Aurifil), scissors, pins, iron
4. embellishments (optional): buttons, ribbons, sequins etc.


Wash and press all fabrics.

Go  HERE  to download and print the template.


Using the paper templates (2 pieces), cut the front pieces.With the 1/4 cm seam allowance, sew them together, right sides inside. Press the seam.

1. The shape you got - is the front side of the doll. Using that shape cut the back side of the doll.

2. For the doll's face: use the provided drawing-design to either print it on the fabric and use it like that or to embroider over it. Another option is to use transfer paper and pen to copy the design onto white piece of fabric or felt. You can easily hand embroider it, to add a bit of flair and texture.


 -I have transferred the face lines onto the heavy weight white fusible interfacing (that way I could easily just iron it in place) and I have embroidered it with Aurifil floss. You can customize the face by removing or adding some lines to the original face drawing.
If you don't like the given shape for the face, you can simply cut 3" circle and stitch it.

Once you are happy with the face, cut out the shape and position it on the head.
Sew the doll’s face to the front side of the doll, using the zig zag stitch.

3. Place the front and back piece, right sides together, pin and sew using 1/4” seam allowance, leaving a gap at the bottom that will allow turning the doll inside out.


 4. Snip the curves a bit to prevent the shape from scrunching. Turn the doll inside out. Fill it with stuffing. Hand stitch the opening gap closed. Add small sequins, buttons or any other cute details to the cheeks as embellishment.

This doll can be a great gift-giving item, for the Holidays. It can be used for kids to play with it or it can be used as a home decor.

If you scale the template to be much bigger in size (like one of the dolls above), it can be nice pillow.

Obviously, if using it as a pillow, don't exaggerate with the craft details, especially sharp plastic items.

Happy sewing,
Katarina

Saturday, 7 December 2013

SEW UK magazine feature


Russian doll page 1

Sew UK magazine cover I was delighted to see my Babushka doll featured in the Sew magazine UK.
All the fabrics used for the doll and other clothes my kids are wearing are from the gorgeous Nordika fabric collection by Jeni Baker for Art Gallery fabrics.

The doll is among Bianka's favourite cuddling toys and it is so easy to make.

You can read all the sewing info on the following magazine's page and you can download the template HERE

I suggest making the embroidered face using the transfer pen and paper, that would give an extra touch ;)
Russian doll page 2

Have a wonderful weekend,
Katarina

Friday, 15 March 2013

More plushies!!!


Ice cream plushies

Just like with the dolls, I am all addicted to dolls and plushies and have been really enjoying making them lately. Ice cream set is available for sale on Etsy.

 Ice cream plushies

Ice cream plushies

As I made quite a few of these lately, this upcoming exhibition will come quite handy to have them all exposed (you are all invited, of course:).

Ice cream plushies

Ice cream plushies

Ice cream plushies

Ice cream plushies


Fox pillow, foxes, dolls and wolfs - cut and sew pattern

Fox pillow, foxes, dolls and wolfs - cut and sew pattern

Fox pillow, foxes, dolls and wolfs - cut and sew pattern

Fox pillow, foxes, dolls and wolfs - cut and sew pattern

Fox pillow, foxes, dolls and wolfs - cut and sew pattern

Fox pillow, foxes, dolls and wolfs - cut and sew pattern

fabric scraps

Another great thing about these SF fabric templates is that (as they are so precious to me), I will use every possible inch of it and so I will actually make some scrappy quilt out of the little leftovers.

fabric scraps fabric scraps

Feels really great to have someone helping and thinking about the kitchen and real food while I am making the play food:)


Have a wonderful weekend,
Katarina

Wednesday, 31 October 2012

Happy Halloween!

Zombie softie doll

For all of you celebrating this Holiday, I wish you the best of fun!!! Here is a little project that would be a great gift for any little girl in your life:) It is very easy to sew and you still have a few hours left to use the 50% sale on fat quarters @ Spoonflower.


Zombie softie doll

Creepy, but yet sweet zombie doll

So, all you need for this creepy, but yet cute zombie doll is a fat quarter of THIS DESIGN, scissors, needle, thread and some stuffing. Sewing machine is optional, but is very helpful:)

Zombie softie doll

Just cut the doll shapes and place the front and back pieces on the top of each other, right sides together. Sew the dolls using 1 cm (1/2") seam allowances, leaving the bottom gap open that will allow turning the doll inside out. Fill the dolls with stuffing. Hand stitch the opening gap closed, and you are done;)

Zombie softie doll

Zombie softie doll

Zombie softie doll


Happy Halloween!!!