. . . . . . . . . . . . . . . . . . . . . . . . . . . . . . . . . . . . . . . . . . . . . . . . . . . . . . . . . . . . . . . . . . . . . . . . . . . . . . . . . . . . . . . . . . . . . . . . . . . . . . . . . . . . . . . . . . . . . . . . . .
Showing posts with label pillow. Show all posts

Friday, 7 June 2024

Pumpkin quilt block - pillow front tutorial


My Eerie fabric collection is already shipping and available in shops, and before doing the regular post introduction about the collection, I have prepared this fun pumpkin block tutorial.


Decorative pillow covers are the easiest and fastest way to change your home décor without a major investment. Bold and funky patterns can sometimes feel overwhelming if used in larger home décor projects but can be fantastic for smaller-scale projects like pillows. They add a touch of color and pattern to your home space. Additionally, quilting adds texture and stability to the sewing/piecing, while trimming around the edges provides a modern look.


To get the printable template, download it HERE.


The featured fabrics: “Creepy Crawlers Tang”, “In The Dark”, “Creepy Crawlers Cement” and  “Seeds Olive” by Katarina Roccella for Art Gallery Fabrics.


Materials

For 1 pillow, finished size 14" x 13.5”

(I suggest adding sashing/borders around if bigger size is needed)


-Fabrics:


Fabric A:  Creepy Crawlers Tang, Fat quarter

Fabric B:  In The Dark, Fat eight

Fabric C:  Creepy Crawlers Cement,  Fat eight

Fabric D:  Seeds Olive, 2.5" square


Decorative trim (pipping or similar): 2 yds

-Medium weight, one-sided fusible interfacing or batting - 16 x 16” piece 

-14"x14” pillow insert

-Cutting mat and rotary cuter 

-Ruler  

-Scissors

-Iron

-Needle and thread

-Sewing machine

-Pins, clips

-Fabric pencil or marker


CUTTING:

¼ seam allowances are included


Two (2) 2.5“ x 14.5” rectangles from Fabric A

Three (3) 2.5” squares from Fabric A

Eight (8) 2.75” squares from Fabric A

One (1) 2.5“ x 4.5” rectangle from Fabric A

Two (2) 2“ x 7.5” rectangles from Fabric A

Two (2) 3.5“ x 4.5” rectangles from Fabric A

Four (4) 2.75” x 4.75” rectangles from Fabric B

One (1) 2.5“ x 4.5” rectangle from Fabric B

Two (2) 2” squares from Fabric B

Four (4) 2.5” squares from Fabric C

Two (2) 2.5“ x 6.5” rectangles from Fabric C

One (1) 2.5“square from Fabric D


Pillow front: pumpkin block


Guided by the cutting and fabric requirements, make 4 Flying geese units.


 • Prepare the 2 ¾” (2.75") squares in fabric A for the wings and 2 ¾” x 4 ¾” (2.75” x 4.75”) in fabric B for the geese body to make the FG units. Mark a diagonal line across the wrong side of all 2 ¾” squares. Place one square on the right corner of a corresponding rectangle, right sides together. Stitch across the corner on the line. Trim off corner, leaving a 1/4" seam. Press corner up.

Place another square on the left corner of the same rectangle, right sides together. Note that the second square will overlap the first one (that’s because you need to obtain the ¼” seam allowance at the top of 

the triangle’s point). Stitch across the corner on the marked line. Trim off corner, leaving a 1/4" seam. 

Press corner up. After all the FG units are sewn together,  trim them to obtain  2 ½ ”x 4 ½ “ units.


Flippy corners on rectangles (row 2, 4 and 6):


• With wrong side up, mark all 2”corner squares in fabric B and 2.5”corner squares in fabric C in half 

diagonally to determine the central - sew line. 

• Paying close attention to the orientation of each corner square: place and align them on the 

corresponding 2” x 7.5“ (row 4) and 2.5” x 14.5“ rectangles (for row 2 and 6) in fabric A and sew along the central diagonal line. 

• Trim off corners, leaving a 1/4” seam allowance, press seams as desired, flipping the corner. 


More about flying geese construction and floppy corners, you can learn HERE.


Adding the trim


With right side of the pillow front up, start pinning the trim all way around, starting from one corner and rounding it slightly on all corners. Sew the trimming in place, with the smallest seam allowance possible, finishing where you started, overlapping the trim’s edges.


Note: there are different weights, qualities and sizes of the trims, and depending on that, you may be able or not to slightly round the corners for the nice and professional finish. Thinner and softer trimmings are more suitable for shaping, while with thicker trimmings, you may be forced to cut the trimming separately for each of the pillow’s edges and overlap the edges on all corners. 


Pillow back


The easiest way to make the pillow back is with simple envelope back. 

Take the rectangles cut for the pillow back (2 Fat quarters), fold and press them on the longer side (22”) in half, wrong sides inside, so that you obtain two 18 x 11” pieces. 


Pillow assemble


Overlap the back pieces, squaring them and place the pillow front with right side inside-facing the overlapped backs. Pin all layers together and cut the backs leftover edges to the size of the pillow front- 14.5" x 14”. Sew around all edges with ¼ seam allowance, rounding the corners slightly, to prevent protruding. Turn the pillow case right side out and place the pillow insert inside.


Wednesday, 14 October 2020

Dunes quilt block - pillow tutorial


Last year, I was asked to create something simple and fun for the Simple sewing magazine, featuring my color master designer box collection. So I designed this easy block constructed with 3" HSTs and turned it into a pillow, actually I made two;)

I was brainstorming ideas for the pillows for my just released Picturesque collection and as HTS are always a good idea for the pillow covers, I used the same block! I also got some HST left overs, so I created another composition, but I will show them both in my next blog post, just wanted to have the original version saved here, before ;)


So here it goes:


Decorative pillow covers are the easiest and fastest way to change the home décor, without major investment. Bold and funky patterns can sometimes be too much or too busy if used in bigger home décor projects, but can be awesome if used for smaller scales projects, like pillows, to embellish and add a touch of color and pattern in your home space. Additionally, quilting adds a bit of texture and stabilize the sewing/piecing, while trimming around the edges, adds a modern look.


To get the printable template, download it HERE


The featured fabrics: “Paprounes Crimson”, “Uninhibited Fashion”, “Steps Above Prism”, “Greeka Fouxia” and  “Morse Dot Sun” from the “Designer’s palette, edition #1” by Katarina Roccella for Art Gallery Fabrics.


Materials

For 1 pillow, finished size 15 x 15”


-Fabrics:

Fabric A:  Paprounes Crimson, Fat eight

Fabric B:  Uninhibited Fashion, Fat quarter

Fabric C:  Steps Above Prism, 5/8 yard

Fabric D:  Greeka Fouxia, Fat eight

Fabric E:  Morse Dot Sun, Fat eight

Decorative trim (pom-pom or similar): 2 yds

-Medium weight, one-sided fusible interfacing or batting - 16 x 16” piece 

-Pompom or other decoratiove trim, 65” long (2 yds)

-16x16” or 15x15” pillow insert

-Cutting mat and rotary cuter* optional

-Ruler  

-Scissors

-Iron

-Needle and thread

-Sewing machine

-Pins

-Fabric pencil or marker


CUTTING:

¼ seam allowances are included


Two (2) 4“ x 4” squares from Fabric A

Ten (10) 4“ x 4” squares from Fabric B

Two (2) 17“ x 22” rectangles from Fabric B (for pillow back)

Ten (10) 4“ x 4” squares from Fabric C

Eight (8) 4“ x 4” squares from Fabric D

Six (6) 4“ x 4” squares from Fabric E


Pillow front


To make the pillow front, there are total of 36 HSTs (half-square triangles).

Guided by the cutting and fabric requirements, make the following HSTs:


A+B    make 4

B+C    make 16

E+D    make 12

D+C    make 4


HSTs construction:


Place and align two 4” x 4” squares in corresponding prints, right sides together and with a marker or pencil draw a diagonal line across the wrong side of the fabric. Sew a 1/4" seam on both sides of the drawn line. Cut the squares on the drawn line. In this way, you will obtain two HST’s. Press seams either open or to one side, upon your preferences. Pressing the seams open eliminates bulk and makes it easier to match the seams. Trim HSTs to 3 x 3”.


Following the quilt block diagram, compose the quilt block: start by joining the HST units (as shown in diagram) in order to obtain the horizontal rows. Sew all right sides together with ¼ seam allowance. Press the seams. Join the composed horizontal rows to complete the block. Press the seams. Fuse the interfacing on the wrong side of the block /pillow front or pin the piece of batting and quilt it. If needed, trim and square the pillow front. 


Adding the trim


With right side of the pillow front up, start pinning the trim all way around, starting from one corner and rounding it slightly on all corners. Sew the trimming in place, with the smallest seam allowance possible, finishing where you started, overlapping the trim’s edges.


Note: there are different weights, qualities and sizes of the trims, and depending on that, you may be able or not to slightly round the corners for the nice and professional finish. Thinner and softer trimmings are more suitable for shaping, while with thicker trimmings, you may be forced to cut the trimming separately for each of the pillow’s edges and overlap the edges on all corners. 


Pillow back


The easiest way to make the pillow back is with simple envelope back. 

Take the rectangles cut for the pillow back, fold and press them on the longer side (22”) in half, wrong sides inside, so that you obtain two 17 x 11” pieces. 


Pillow assemble


Overlap the back pieces, squaring them and place the pillow front with right side inside-facing the overlapped backs. Pin all layers together and cut the backs leftover edges to the size of the pillow front- 15.5 x 15.5”. Sew around all edges with ¼ seam allowance, rounding the corners slightly, to prevent protruding. Turn the pillow case right side out and place the pillow insert inside.


xx

Katarina

Friday, 21 November 2014

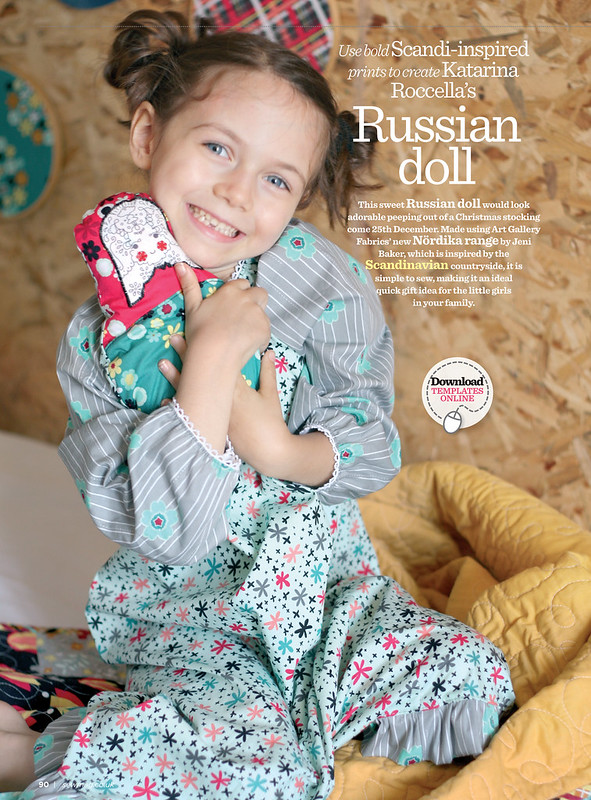
Tutorial-pattern for soft fabric Matryoshka doll


I have used this pattern to make cute Nordika doll (Nordika collection by Jeni Baker), that was featured in the December 2013 issue of Sew magazine UK.

Russian doll page 1

I am thrilled that now I can share this pattern with all of you and that I can use my Recollection line to sew a few dolls.

 Doll dimensions: 7 x 9.5" (17.5 x 24 cm)

 Needed supplies:

1. fabric: this is great project using scraps
2. small piece of heavy weight fusible interfacing (for the face)
3. sewing machine, thread (for the best results - use Aurifil), scissors, pins, iron
4. embellishments (optional): buttons, ribbons, sequins etc.


Wash and press all fabrics.

Go  HERE  to download and print the template.


Using the paper templates (2 pieces), cut the front pieces.With the 1/4 cm seam allowance, sew them together, right sides inside. Press the seam.

1. The shape you got - is the front side of the doll. Using that shape cut the back side of the doll.

2. For the doll's face: use the provided drawing-design to either print it on the fabric and use it like that or to embroider over it. Another option is to use transfer paper and pen to copy the design onto white piece of fabric or felt. You can easily hand embroider it, to add a bit of flair and texture.


 -I have transferred the face lines onto the heavy weight white fusible interfacing (that way I could easily just iron it in place) and I have embroidered it with Aurifil floss. You can customize the face by removing or adding some lines to the original face drawing.
If you don't like the given shape for the face, you can simply cut 3" circle and stitch it.

Once you are happy with the face, cut out the shape and position it on the head.
Sew the doll’s face to the front side of the doll, using the zig zag stitch.

3. Place the front and back piece, right sides together, pin and sew using 1/4” seam allowance, leaving a gap at the bottom that will allow turning the doll inside out.


 4. Snip the curves a bit to prevent the shape from scrunching. Turn the doll inside out. Fill it with stuffing. Hand stitch the opening gap closed. Add small sequins, buttons or any other cute details to the cheeks as embellishment.

This doll can be a great gift-giving item, for the Holidays. It can be used for kids to play with it or it can be used as a home decor.

If you scale the template to be much bigger in size (like one of the dolls above), it can be nice pillow.

Obviously, if using it as a pillow, don't exaggerate with the craft details, especially sharp plastic items.

Happy sewing,
Katarina

Tuesday, 22 January 2013

RnR cushion


disclosure: this post was edited, b/c I had issues with someone steeling my pics and sharing them on FB.  A note to myself- never share pics that you might see somewhere else on the net, disliking that! Not all people play fair!

RnR cushion

During the last month, I managed to play with some real, modern stuff and beautiful fabrics and I made one modern cushion for me too:). Here are some pics...

RnR cushion

RnR cushion


RnR cushion

xx, Katarina

Friday, 21 September 2012

Easy mustache pillow cases tutorial (envelope type)


Mustache ikat pillow cases

I am sure you all know how to make really simple pillow cases (no zippers involved), but thought I could however make some pics and explanations, especially as I created the Mustache cut and sew template available through Spoonflower.

Mustache pillow cases Mustache pillow cases

Mustache themed fabrics are a huge hit in the fabric world for a few years now, and are among my best seller fabrics. To make them a bit different, I added the ikat touch to the mustache shape and created the 18 x 18" panels, that are very easy to just cut and sew. Of course you can create any size of the pillow you want using this easy method.

Mustache pillow cases 18 x 18" tutorial

In case you don't like the mustaches and that fabric set, you may use any other fabric you like and just cut like this:


So here we go:

Needed supply:
1. printed fabric template (ordered through Spoonflower) or 1 yard of any other home decor fabric (54 x 36")
2. sewing machine, thread, scissors (rotary cutter), pins
-----

Mustache pillow cases 18 x 18" tutorial Iron and cut the fabric. You can assemble front and back pieces in way you like most (maybe you can have the black front and white back or you can create some neat patchwork horizontal stripes for the back out of the two back fabrics)

Mustache pillow cases 18 x 18" tutorial

In my template-pattern, I cut the back of the pillow in 3 pieces: 13x 18", 15 x 18" and I had one small 8" piece left (can be used for some other project or in case you are combining the 2 back mustache fabrics and doing the patchwork stripes, than you will have just the right amount of the fabric)

Mustache pillow cases 18 x 18" tutorial

Mustache pillow cases 18 x 18" tutorial

Sew the seams on the 2 edges (those that are going one over another) of the back fabric pieces.

Mustache pillow cases 18 x 18" tutorial

Make sure that the pattern is exposed nicely when the back layers are placed one over another.

Mustache pillow cases 18 x 18" tutorial

Mustache pillow cases 18 x 18" tutorial

Use some pins if needed to assemble the back pieces.

Mustache pillow cases 18 x 18" tutorial

Sew along the pinned edges (I used serger, but using the normal stitch with the sewing machine is more than fine).

Mustache pillow cases 18 x 18" tutorial Place the front and back piece right sides together (cut the corners).

Mustache pillow cases 18 x 18" tutorial

Pin and sew along the edges (all 4).

Mustache pillow cases 18 x 18" tutorial

You are done, now you just need to turn the pillow case to the right side, through the back gap.

Mustache pillow cases 18 x 18" tutorial

Here are the finished pillow cases(front and back view):

Mustache pillow cases 18 x 18" tutorial

Mustache pillow cases

Mustache pillow cases

Happy sewing:) Katarina, xx