Patchwork hoodie, as a sort of quilted coat or jacket was something that I always wanted to make.
And ever since I created this coat 13 years ago (how is that possible?), I had a desire to make something similar, even because that coat was over-worn and loved so much that the fabrics started to show many signs of that. And that was the period when I didn't know anything about patchwork and quilting, so I used the fabrics that had that collaged vibe.
So, back to the actual hoodie - I searched for a pattern that was featuring raglan sleeve (a sleeve that extends in one piece fully to the collar, leaving a diagonal seam from underarm to collarbone) and Burda's 6718 pattern was just what I needed. I think that even this free pattern can be great, but the sleeve type just wasn't the one I wanted to do for this particular patchwork style and I think that raglan sleeves are really even beginner friendly.
I used my "Stamped Grove" flannel as a base to sew my patchwork pieces to it. I was planning to use a matching "Woodlandia" flannel from the same, Botanist collection as the rest of my fabrics, but shipping problems just didn't allow that.
And yet, as that backing or inner part of the hoodie isn't visible, it really doesn't matter. You can use even any kind of plain flannel or even cotton batting (or both to add an extra level of coziness).
Beside fabrics for patchwork and flannel for the base or lining, (calculate at least 2-3 yds in total for the patchwork-outer part and the same for the lining) you will need around 1.5-2 yds of the trimming for wrist cuffs and waistline or some kind of jersey fabric that can be cut in strip, folded and used as ribbing. You can also add the eyelets and a cord within the hoodie part- as the pattern provides.
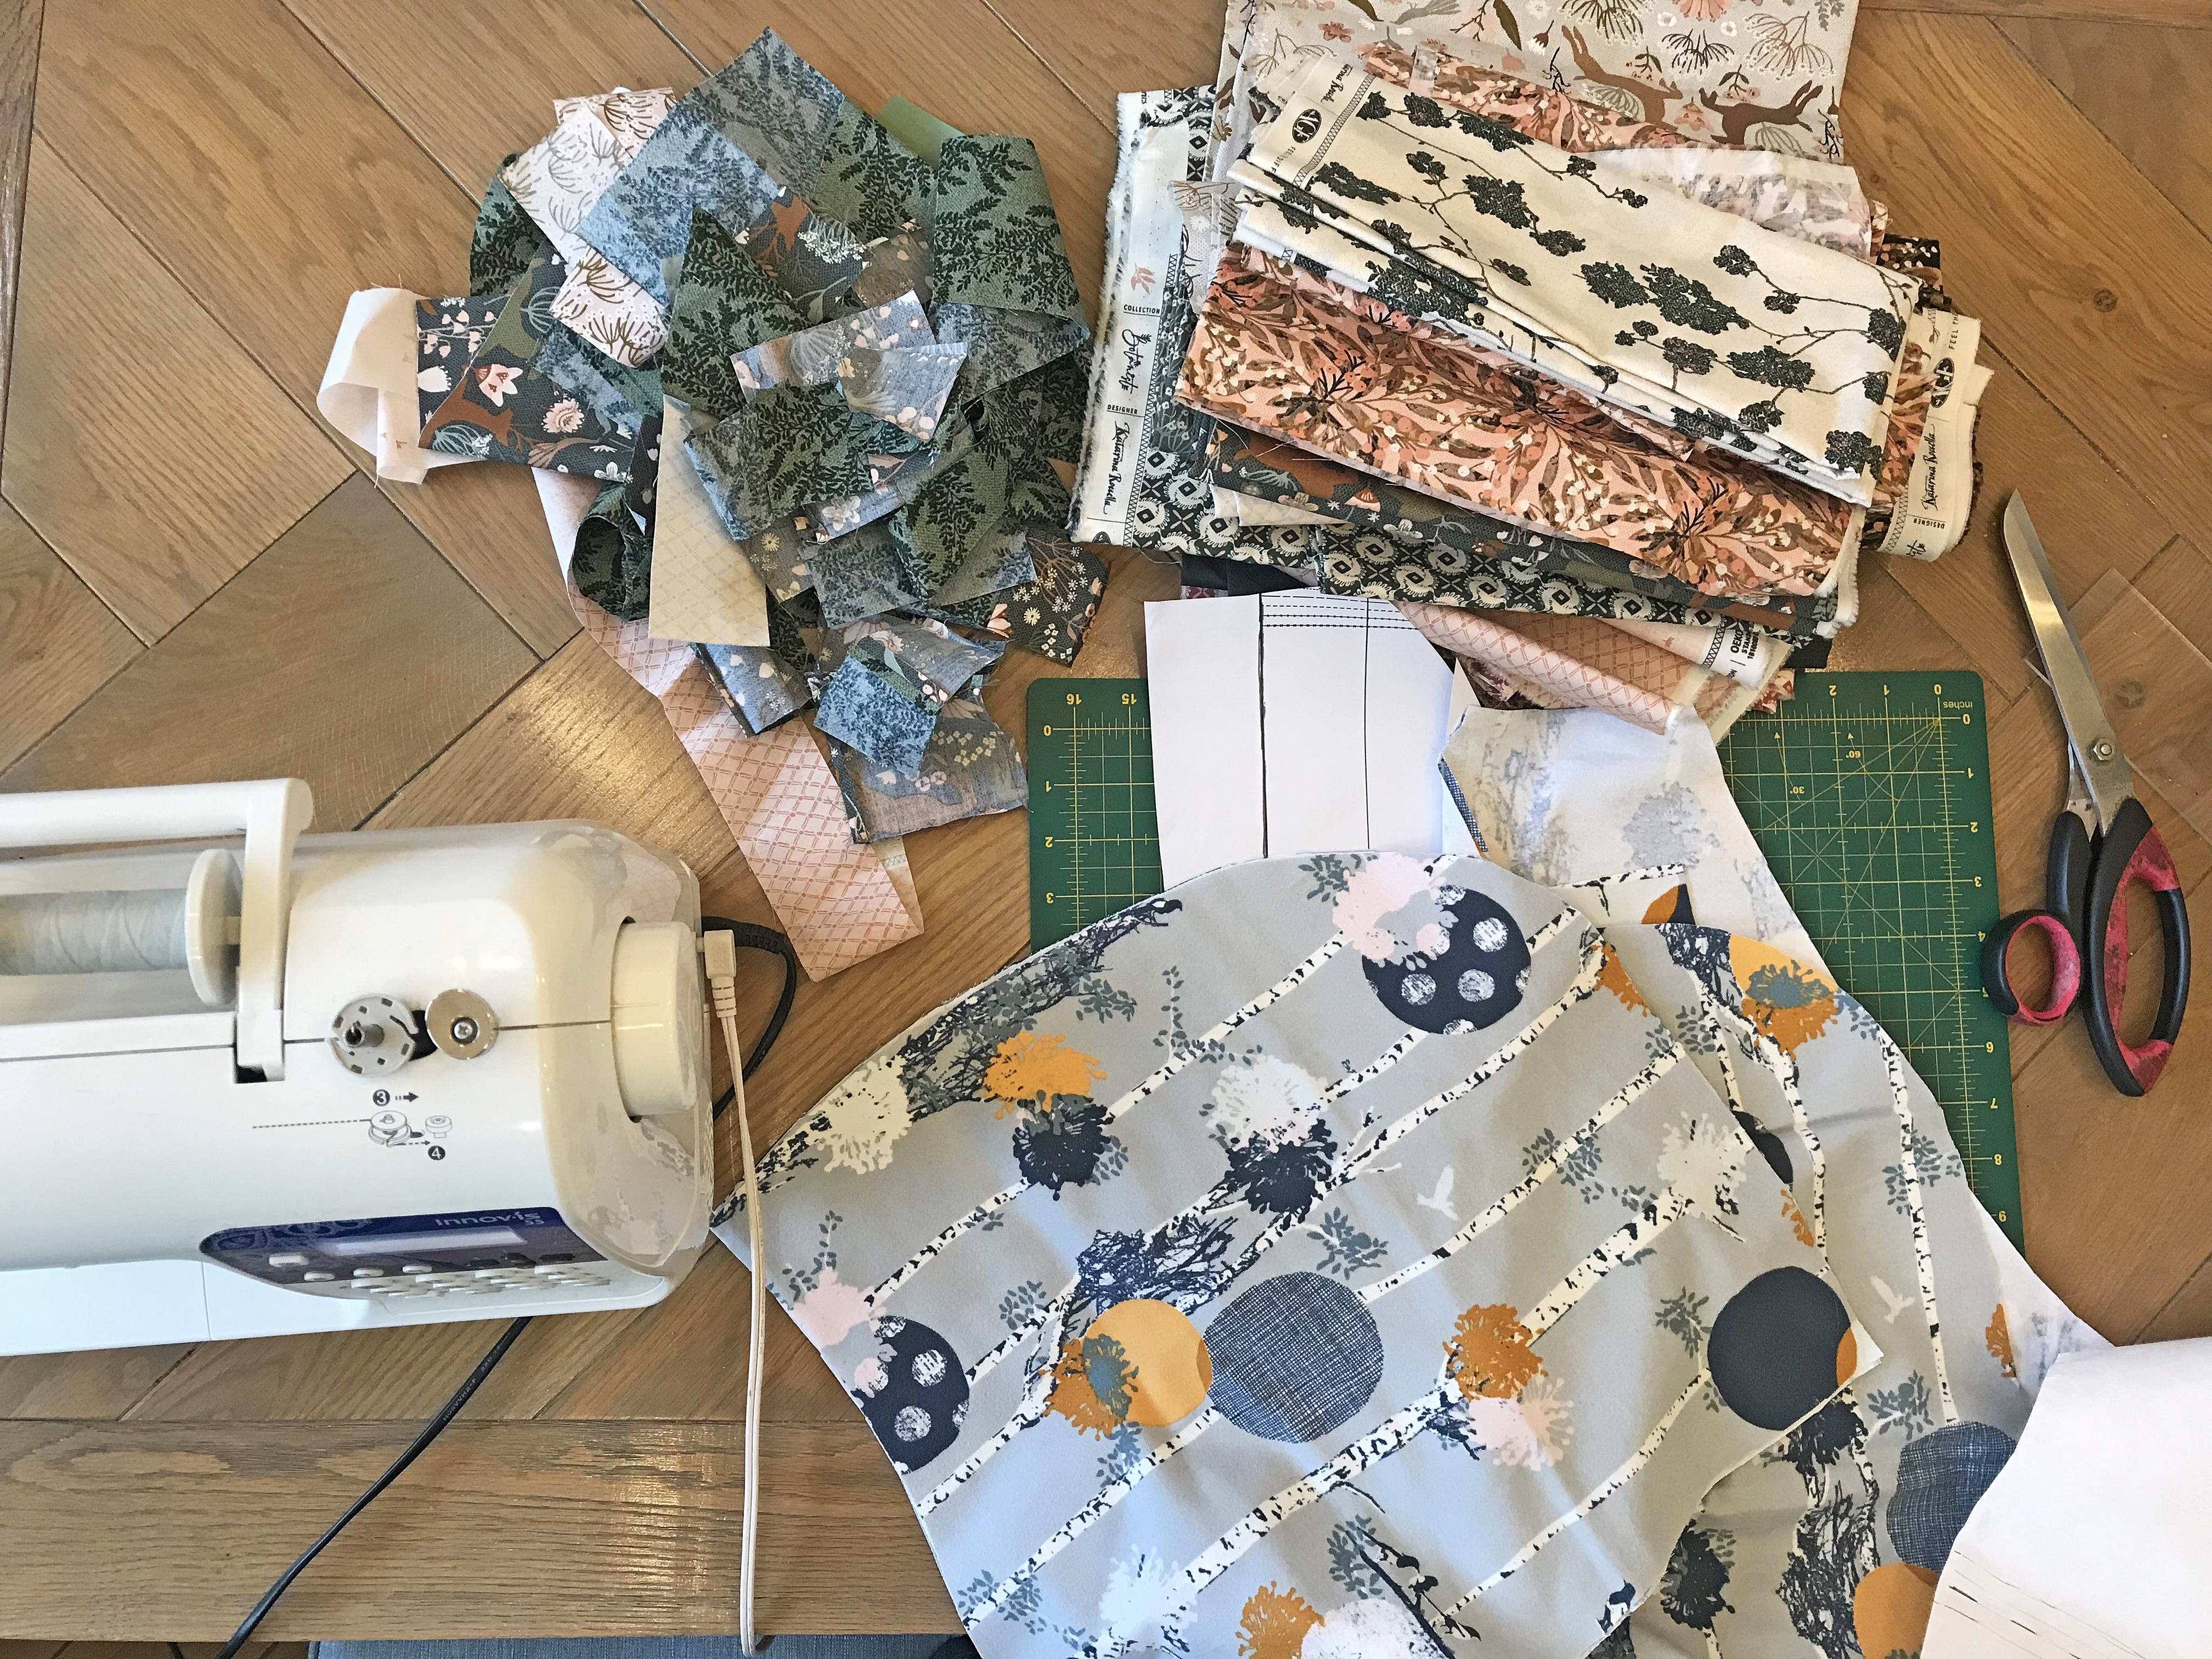
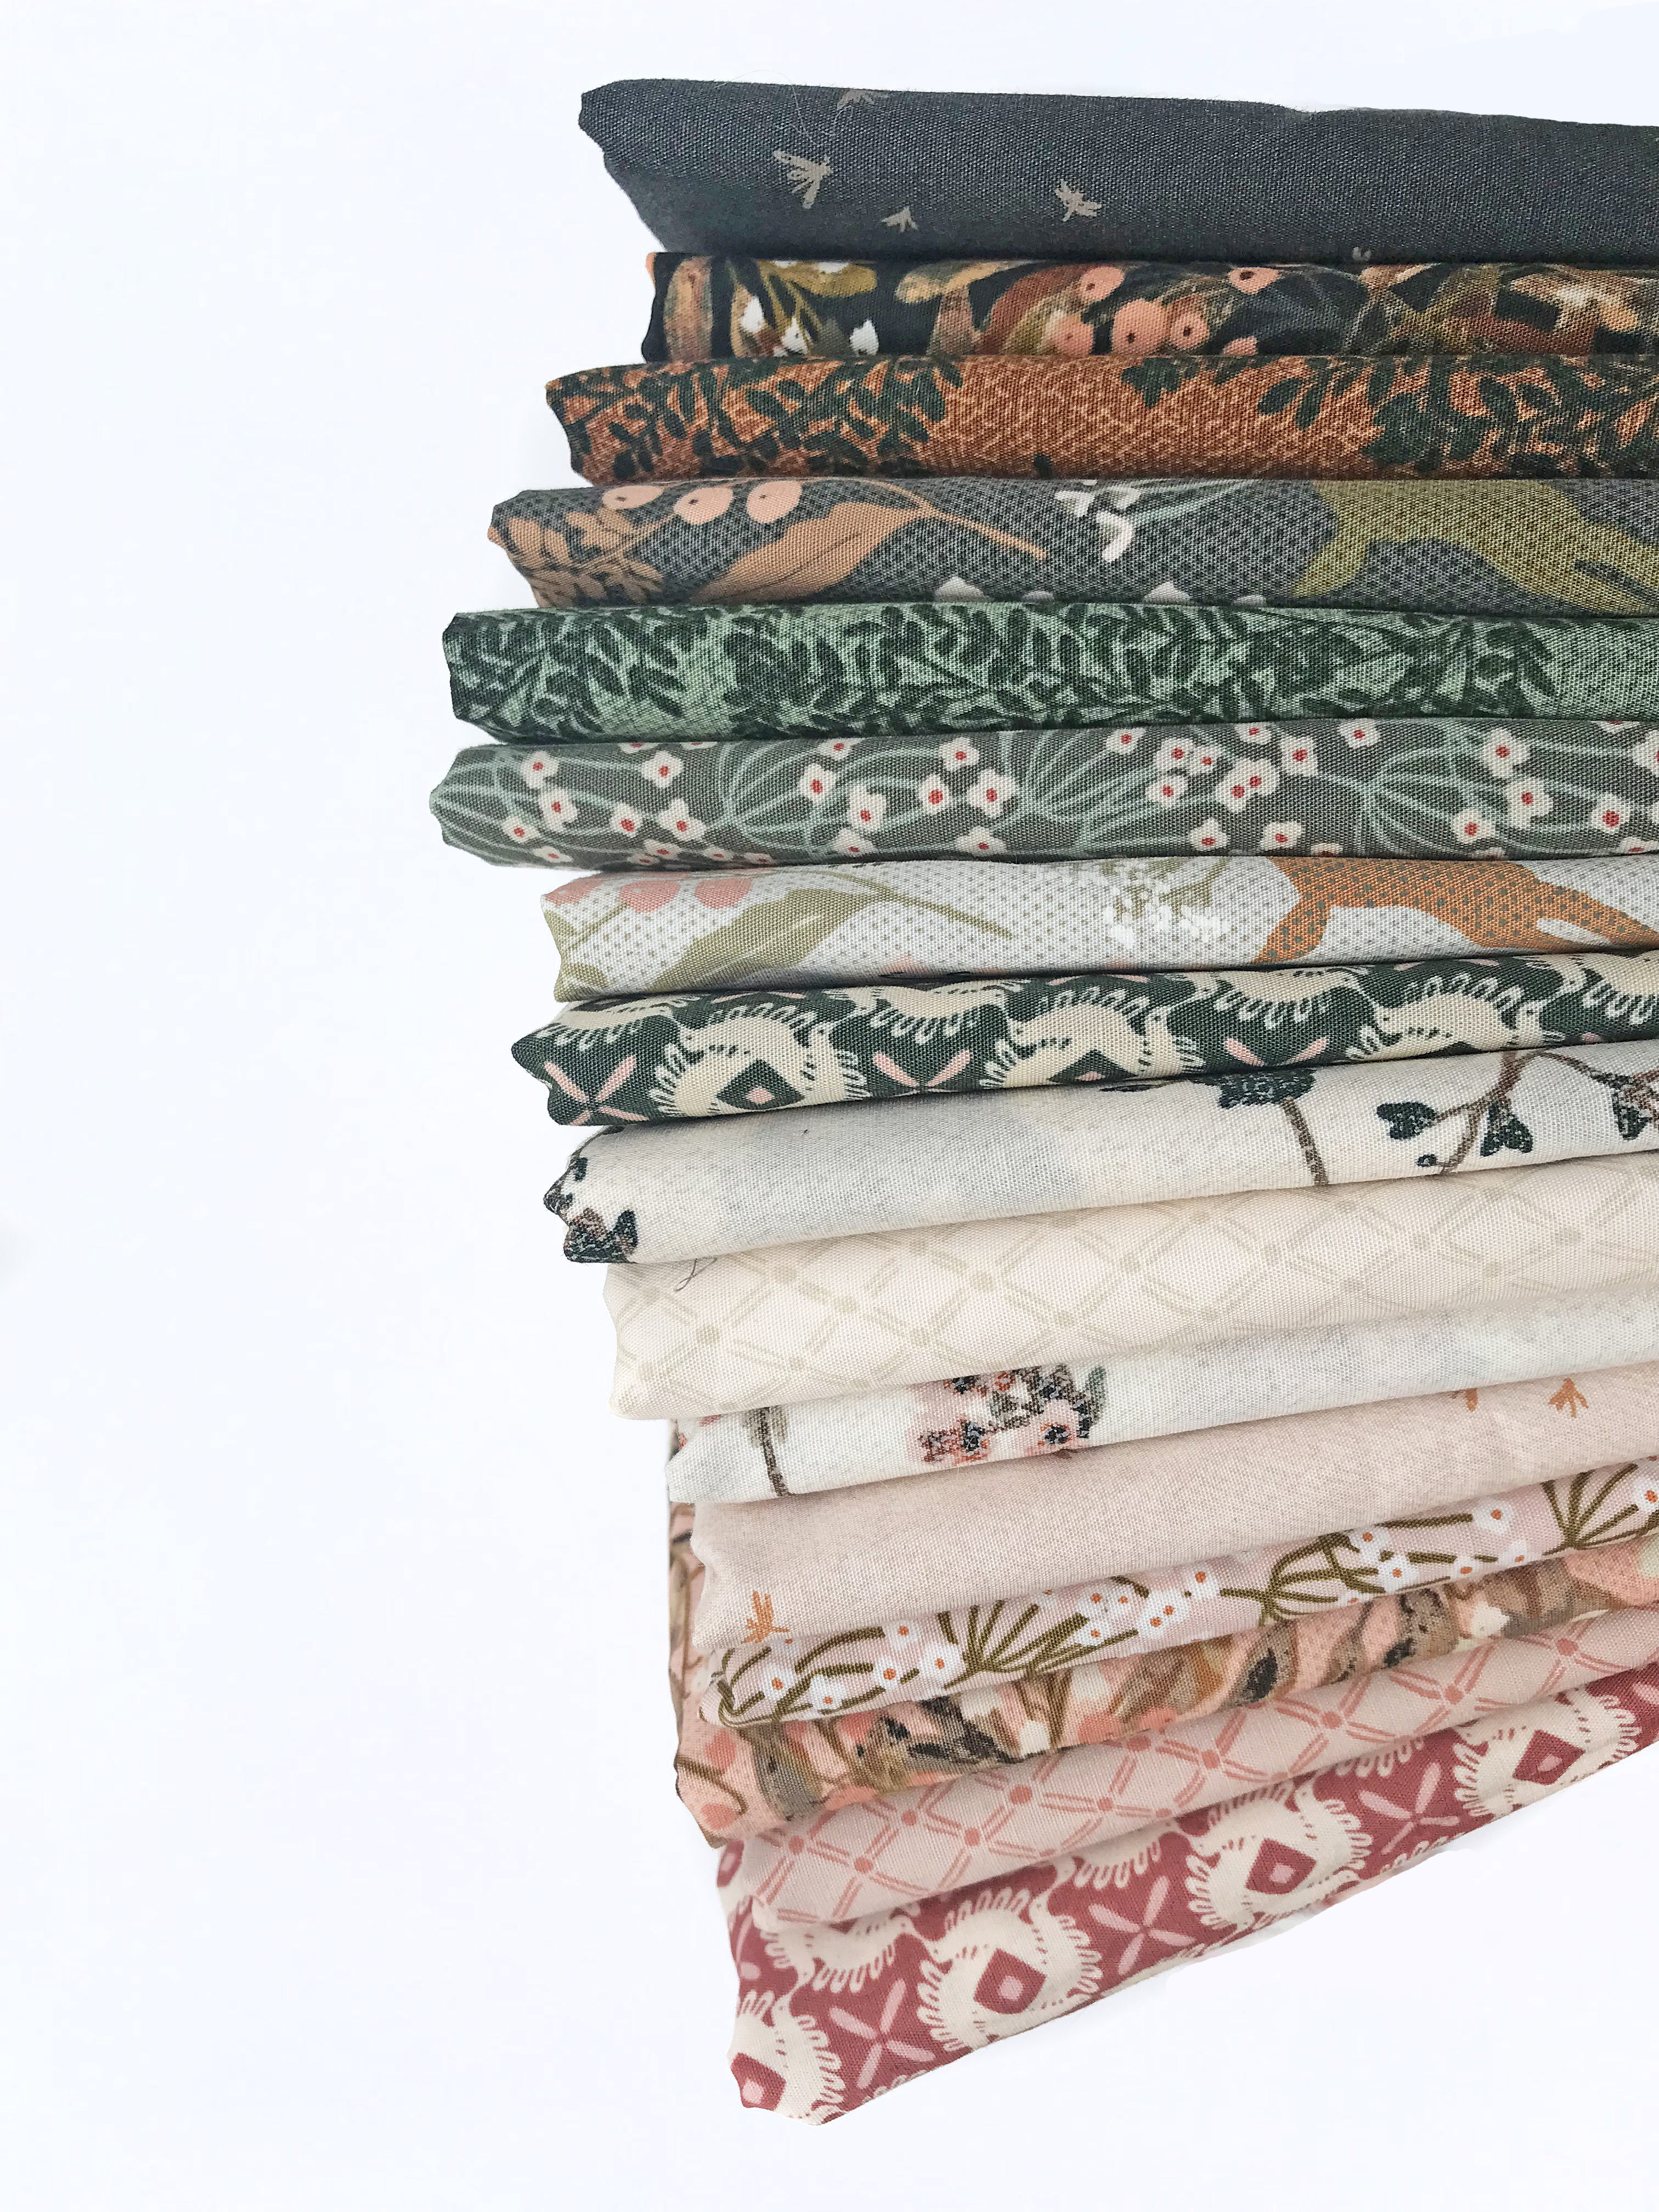
The first thing to do is to decide on the fabrics you will use, in my case it was easy as I had my collection that was already curated like that so I just added a few pure solids to add some colorful accents and a bit of whimsy. This hoodie was planned for my son, who's modeling it, but I think that I will find a way to steal it :)
As this all started as an experiment (it was the first time to use this pattern and also this method), so I really wasn't sure what I will get and how satisfied I will be with the result. But I can say that I am very excited about it, loved the process and I am already looking forward to the next one.
What I have learnt is that the pattern itself (all Burda patterns don't have the seam allowance calculated, so you need to add them) can run a bit small but only due to the fact that the materials used for this project aren't stretchy like usual knit fabrics that are used for hoodies. So, even if this is the Men's pattern and my 18 yrs old son (almost 180 cm height) is wearing an M, I used the last available size marked lines to cut all my fabrics - I believe it would be like an XL. Next time, I will add just a tiny bit to it, except to the hoodie-head part itself. And I will round it a bit better. But everything fitted nicely and I absolutely didn't have any issues, so I can highly recommend it!
I was driven by the quilt as you go method to assemble the strip sets that I organized in rows.
From all the fabrics I wanted to use, I have cut 2", 2.5", 3", 3.5" and 4" wide strips. At least 2 strips of each of 16 fabrics + around 10 solids.
So I think that a fat quarter bundle of a collection that has at least 10 assorted prints would be fine for one hoodie-for the external, or top part.
With the fabric strips I made the random strip sets, combining fabrics in no particular way. Some strip sets were longer, some narrower, some shorter, so really just upon liking. I also had some leftovers from my previous project: Winterflake quilt and it was great to use them too. So I think that any patchwork or quilt bock leftovers can be great for this type of hoodie.
After making the strip sets, I have cut them into same 2", 2.5", 3", 3.5" and 4" increments-strips (on the 90° from the pieced seams).
I started from the bottom parts of the cut flannel pieces, adding strips in rows, going up, trying to maintain good alignment. I draw a few horizontal lines to guide me additionally. Flannel was very good option for this as it would nicely adhere quilting cotton strips, so I didn't have to press my rows with iron frequently.
The first thing I did was the smallest - the front pocket. After finishing the exposed, patchwork side of the pocket, I have lined the pocket with another plain piece of fabric, as I thought that it would be better and cleaner than just sewing the pocket to the front hoodie part over folded edges.
I started to sew the patchwork strips on the front hoodie part according to the same pocket strip order, as I wanted to have "invisible" transition.
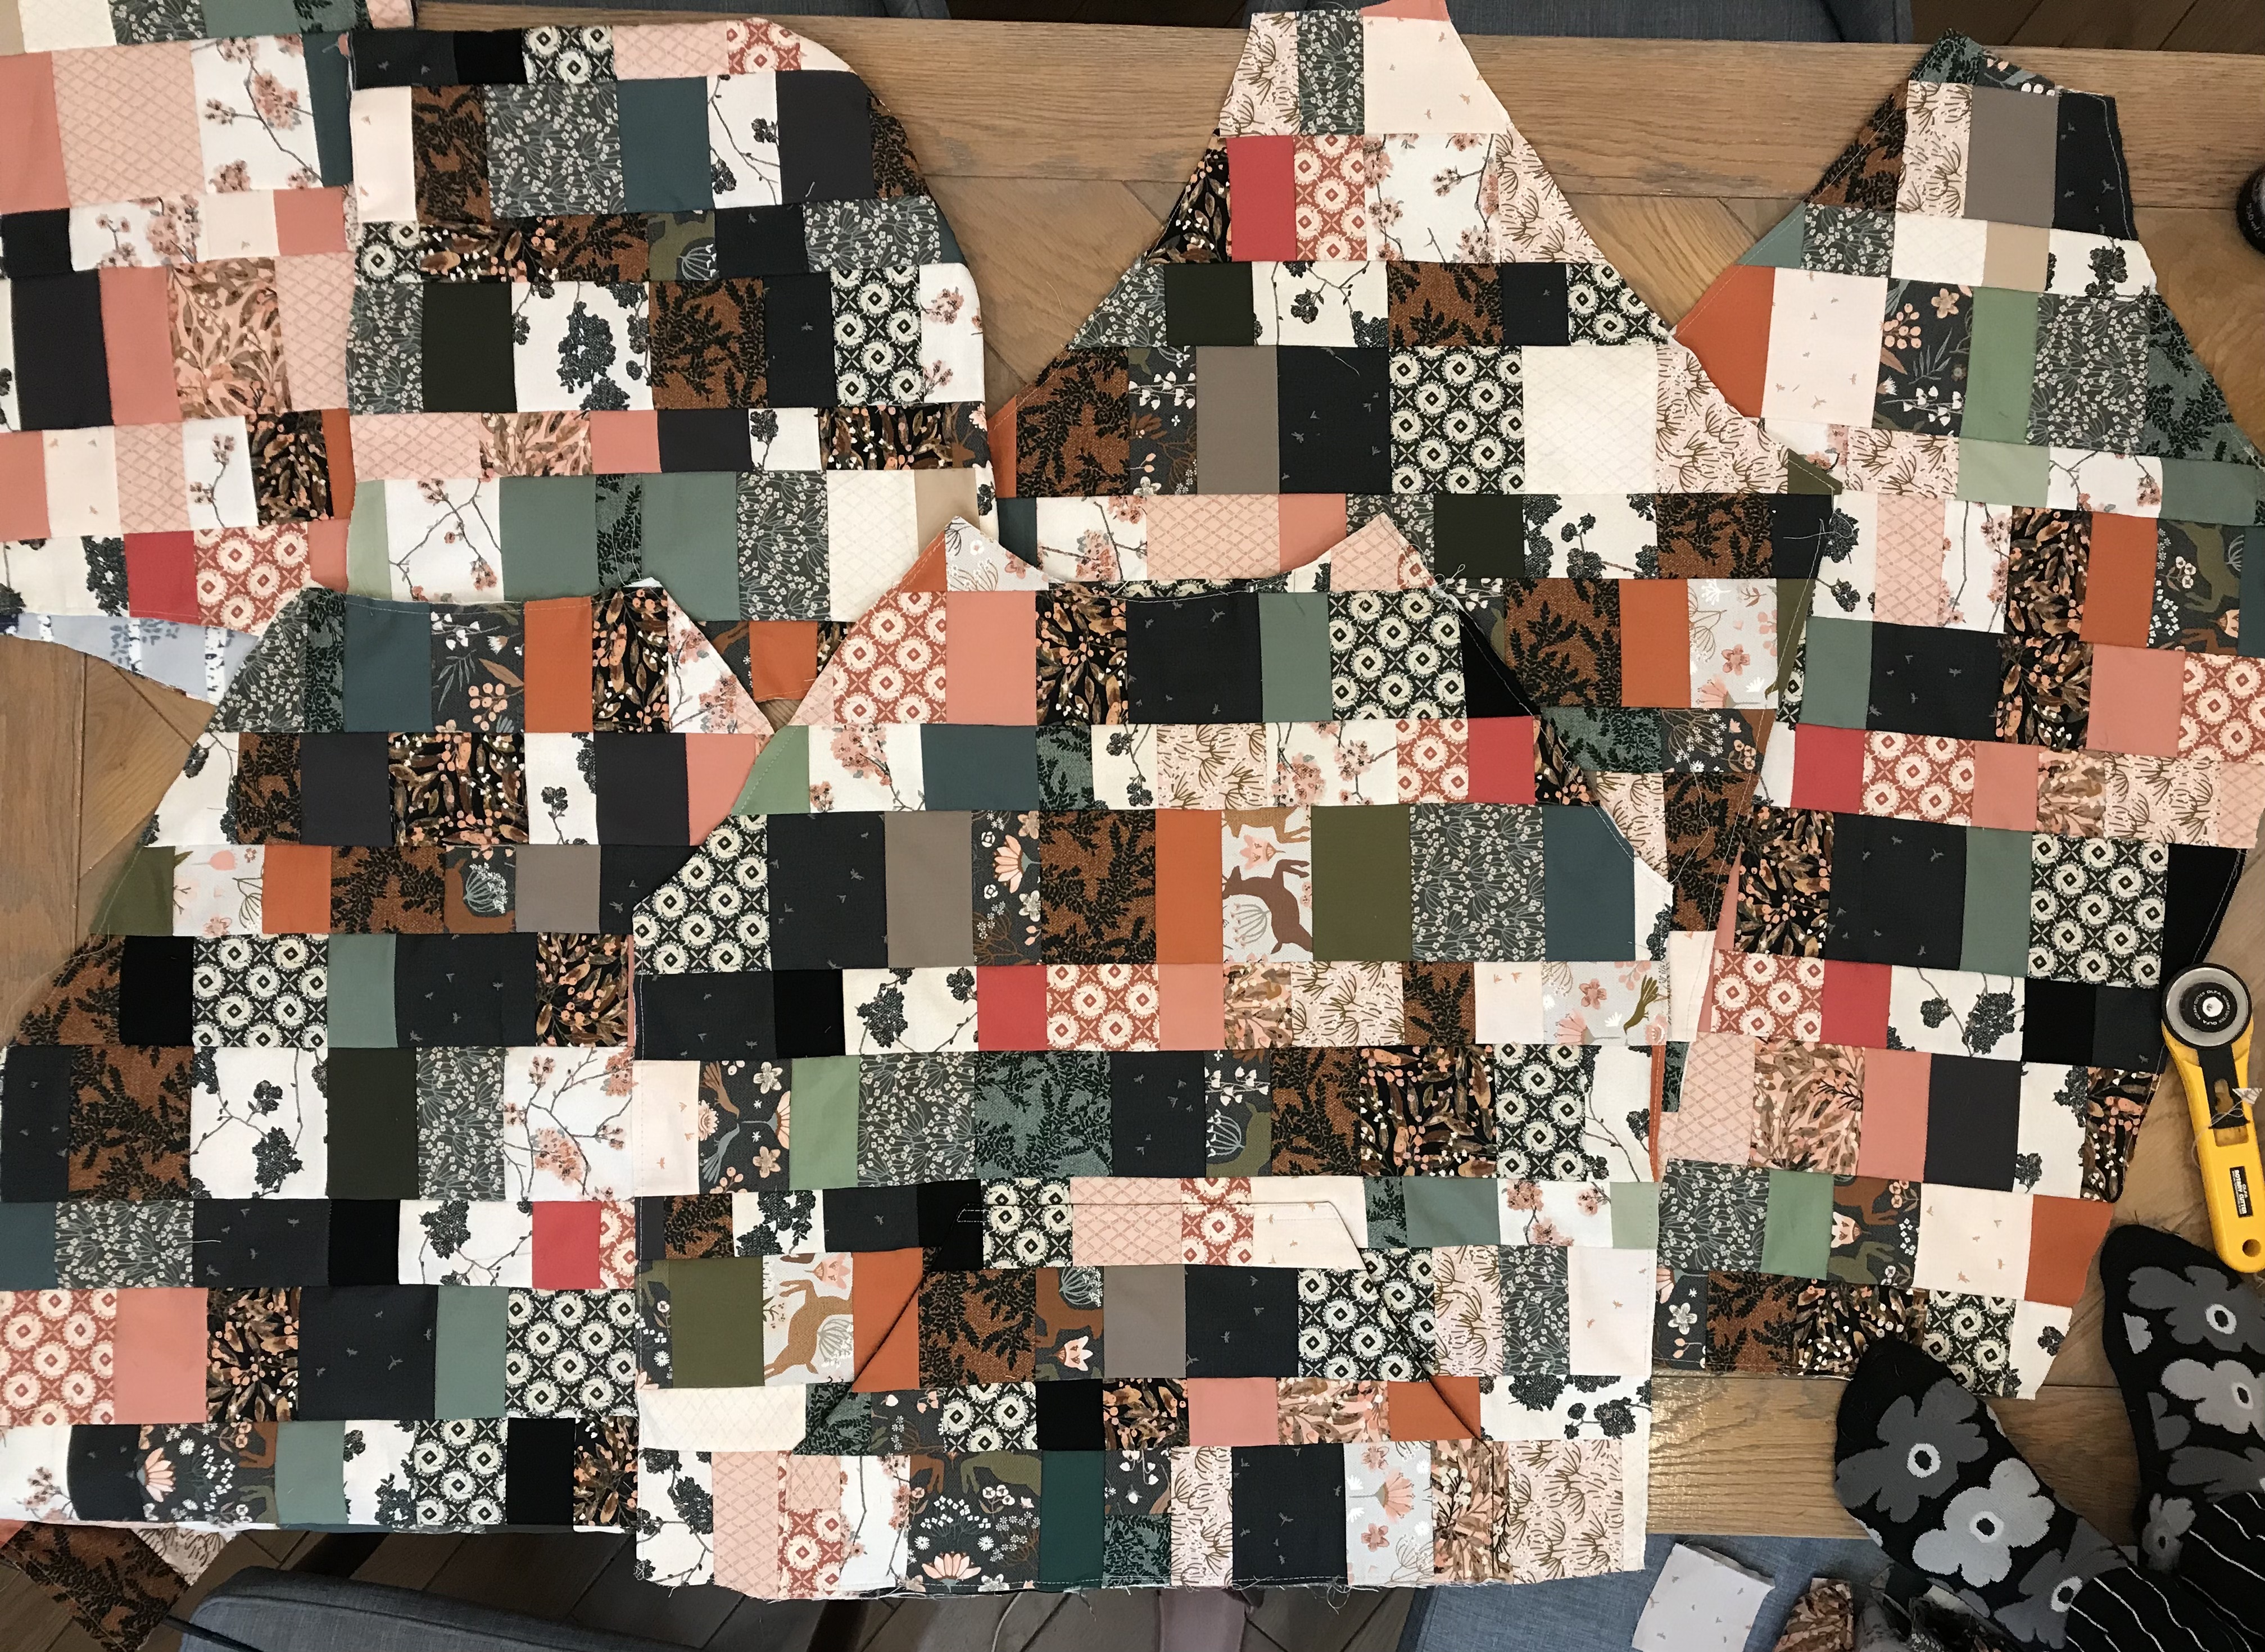
Here are all the hoodie pieces before final assembling.
I made a video where I tried to gather some small video clips and pics that I took during the sewing and assembling, as it may be easier to understand.
I really hope that you may find this inspiring and I really think that this is amazing way to use some loved fabric scraps and quilt blocks and leftovers! And I think that it's easier than making a jacket or coat, so maybe worth trying before sewing something a bit more delicate.
My son loves it so much and I am sure it will be a show stopper 😎
(I am missing so much the period when my kids were small and actually wanted to wear some mommy made clothes, so this was such a wonderful request and honor for me to make🤟)
xx
Katarina
Patchwork hoodie, as a sort of quilted coat or jacket was something that I always wanted to make.
And ever since I created this coat 13 years ago (how is that possible?), I had a desire to make something similar, even because that coat was over-worn and loved so much that the fabrics started to show many signs of that. And that was the period when I didn't know anything about patchwork and quilting, so I used the fabrics that had that collaged vibe.
So, back to the actual hoodie - I searched for a pattern that was featuring raglan sleeve (a sleeve that extends in one piece fully to the collar, leaving a diagonal seam from underarm to collarbone) and Burda's 6718 pattern was just what I needed. I think that even this free pattern can be great, but the sleeve type just wasn't the one I wanted to do for this particular patchwork style and I think that raglan sleeves are really even beginner friendly.
I used my "Stamped Grove" flannel as a base to sew my patchwork pieces to it. I was planning to use a matching "Woodlandia" flannel from the same, Botanist collection as the rest of my fabrics, but shipping problems just didn't allow that.
And yet, as that backing or inner part of the hoodie isn't visible, it really doesn't matter. You can use even any kind of plain flannel or even cotton batting (or both to add an extra level of coziness).
Beside fabrics for patchwork and flannel for the base or lining, (calculate at least 2-3 yds in total for the patchwork-outer part and the same for the lining) you will need around 1.5-2 yds of the trimming for wrist cuffs and waistline or some kind of jersey fabric that can be cut in strip, folded and used as ribbing. You can also add the eyelets and a cord within the hoodie part- as the pattern provides.
The first thing to do is to decide on the fabrics you will use, in my case it was easy as I had my collection that was already curated like that so I just added a few pure solids to add some colorful accents and a bit of whimsy. This hoodie was planned for my son, who's modeling it, but I think that I will find a way to steal it :)
As this all started as an experiment (it was the first time to use this pattern and also this method), so I really wasn't sure what I will get and how satisfied I will be with the result. But I can say that I am very excited about it, loved the process and I am already looking forward to the next one.
What I have learnt is that the pattern itself (all Burda patterns don't have the seam allowance calculated, so you need to add them) can run a bit small but only due to the fact that the materials used for this project aren't stretchy like usual knit fabrics that are used for hoodies. So, even if this is the Men's pattern and my 18 yrs old son (almost 180 cm height) is wearing an M, I used the last available size marked lines to cut all my fabrics - I believe it would be like an XL. Next time, I will add just a tiny bit to it, except to the hoodie-head part itself. And I will round it a bit better. But everything fitted nicely and I absolutely didn't have any issues, so I can highly recommend it!
I was driven by the quilt as you go method to assemble the strip sets that I organized in rows.
From all the fabrics I wanted to use, I have cut 2", 2.5", 3", 3.5" and 4" wide strips. At least 2 strips of each of 16 fabrics + around 10 solids.
So I think that a fat quarter bundle of a collection that has at least 10 assorted prints would be fine for one hoodie-for the external, or top part.
With the fabric strips I made the random strip sets, combining fabrics in no particular way. Some strip sets were longer, some narrower, some shorter, so really just upon liking. I also had some leftovers from my previous project: Winterflake quilt and it was great to use them too. So I think that any patchwork or quilt bock leftovers can be great for this type of hoodie.
After making the strip sets, I have cut them into same 2", 2.5", 3", 3.5" and 4" increments-strips (on the 90° from the pieced seams).
I started from the bottom parts of the cut flannel pieces, adding strips in rows, going up, trying to maintain good alignment. I draw a few horizontal lines to guide me additionally. Flannel was very good option for this as it would nicely adhere quilting cotton strips, so I didn't have to press my rows with iron frequently.
The first thing I did was the smallest - the front pocket. After finishing the exposed, patchwork side of the pocket, I have lined the pocket with another plain piece of fabric, as I thought that it would be better and cleaner than just sewing the pocket to the front hoodie part over folded edges.
I started to sew the patchwork strips on the front hoodie part according to the same pocket strip order, as I wanted to have "invisible" transition.
Here are all the hoodie pieces before final assembling.
I made a video where I tried to gather some small video clips and pics that I took during the sewing and assembling, as it may be easier to understand.
I really hope that you may find this inspiring and I really think that this is amazing way to use some loved fabric scraps and quilt blocks and leftovers! And I think that it's easier than making a jacket or coat, so maybe worth trying before sewing something a bit more delicate.
My son loves it so much and I am sure it will be a show stopper 😎
(I am missing so much the period when my kids were small and actually wanted to wear some mommy made clothes, so this was such a wonderful request and honor for me to make🤟)
xx
Katarina
2 comments
:
Anonymous
said...
This is the best quilted garment I’ve seen yet! Very inspiring, thank you for your blog post!
Hi! I'm proud mama of 3 gorgeous kids that are true inspiration for my work. I love to create and express myself through many forms of art: collages, drawings, illustrations, calligraphy, graphic design, textile and surface design, printing, photography, sewing.....


.jpg)


 GRID
GRID
 DECADENCE


2 comments :
This is the best quilted garment I’ve seen yet! Very inspiring, thank you for your blog post!
Quarter and half-zip hoodies offer easy layering and a modern look.
Post a Comment